How I Hacked my Car Part 3: Making Software
Note: As of 2022/10/25 the information in this series is slightly outdated. Hyundai released DAudio2 134.100.220927 which fixes the found security issues. This latest update contains two update files. One that uses the old, flawed keys and one that uses the new keys. This guide should technically still work using the update file that uses the old keys, but I have not verified it personally. This latest update also removes the header files which makes development for this platform more difficult.
If you haven’t read Part 1 and Part 2 please do so.
Making Software⌗
I am a programmer by nature. I now had root access to a cool new linux box so now I must develop software for it.
The Goal⌗
While looking through many of the IVI’s files, I found tons of really cool C++ header files relating to ccOS in /usr/include.
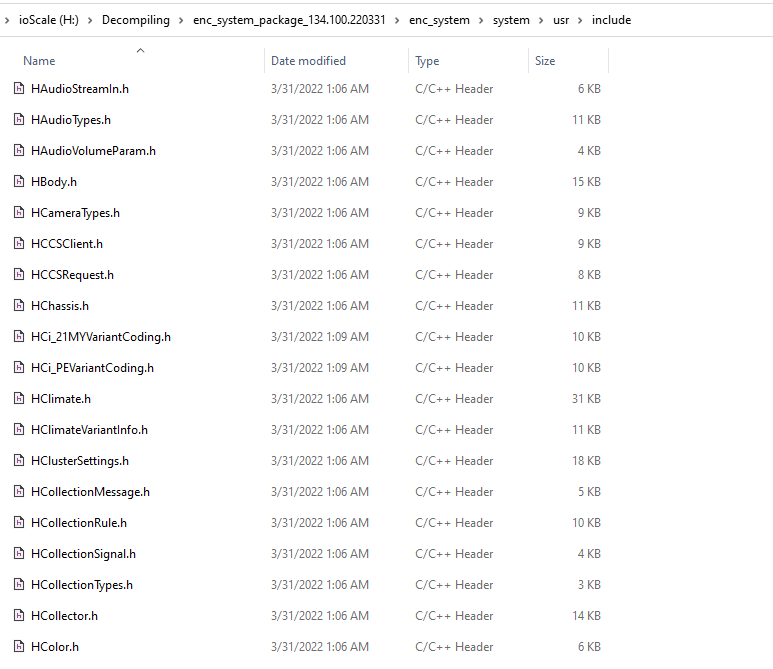
ccOS is the Connected Car Operating System, an OS developed by Nvidia and Hyundai which is supposed to power all Hyundai vehicles from 2022 onwards, but I guess some of the underlying system was in previous Hyundai vehicles for quite some time. Some of the oldest header files have copyright comments from 2016.
Based on the header files, it looked like they provided a very convinent way to interact with the vehicle, providing functions to query things like the odometer and battery voltage, as well as perform actions like start the engine or lock/unlock the doors.
The Road of Mistakes⌗
I wanted to make a basic program that used the ccOS header files to read the status of the doors as well as send a lock or unlock signal to them. I installed Visual Studio Code and the latest version of the g++ arm cross compiler (arm-linux-gnueabi-g++ from the g++-arm-linux-gnueabi package) onto my Kali VM.
For the first app I would make a simple console based app that would readout if the driver’s side door was open or closed.
In one of the ccOS header files called HBody.h, contained the class HBody. HBody is a singleton and included a static method to get the instance of the HBody. HBody itself included a method called isDoorOpened allows you to see if a specific door is open or not.
All of the query functions in HBody returned a HResult which indicated if it was able to successfully query the object, or what error prevented it from doing so. Each query method also took in a reference to some output type to provide the actual query results.
The isDoorOpened function takes in a HDoorPosition enum to specify what door you are seeing is opened (Front Left/Right, Back Left/Right, or Tail gate) and a reference to a HTriState which indicates if the door is open (False, True, Invalid).
Here was the code I came up with:
#include <iostream>
#include <vector>
#include <string>
#include "HBody.h"

using namespace std;

const char* HResultToString(ccos::HResult result)
{
    switch (result)
    {
        case ccos::HResult::INVALID:
            return "INVALID";
        case ccos::HResult::OK:
            return "OK";
        case ccos::HResult::ERROR:
            return "ERROR";
        case ccos::HResult::NOT_SUPPORTED:
            return "NOT_SUPPORTED";
        case ccos::HResult::OUT_OF_RANGE:
            return "OUT_OF_RANGE";
        case ccos::HResult::CONNECTION_FAIL:
            return "CONNECTION_FAIL";
        case ccos::HResult::NO_RESPONSE:
            return "NO_RESPONSE";
        case ccos::HResult::UNAVAILABLE:
            return "UNAVAILABLE";
        case ccos::HResult::NULLPOINTER:
            return "NULLPOINTER";
        case ccos::HResult::NOT_INITIALIZED:
            return "NOT_INITIALIZED";
        case ccos::HResult::TIMEOUT:
            return "TIMEOUT";
        case ccos::HResult::PERMISSION_DENIED:
            return "PERMISSION_DENIED";
        case ccos::HResult::ALREADY_EXIST:
            return "ALREADY_EXIST";
        case ccos::HResult::SOME_UNAVAILABLE:
            return "SOME_UNAVAILABLE";
        case ccos::HResult::INVALID_RESULT:
            return "INVALID_RESULT";
        case ccos::HResult::MAX:
            return "MAX";
    default:
            return "Other";
    }
}

int main()
{
    cout << "Ioniq Test Application";
    cout << endl;

    ccos::vehicle::general::HBody *body = ccos::vehicle::general::HBody::getInstance();

    ccos::vehicle::HTriState doorState;
    ccos::HResult doorOpenedResult = body->isDoorOpened(ccos::vehicle::HDoorPosition::FRONT_LEFT, doorState);
    if (doorOpenedResult == ccos::HResult::OK) {
        cout << "Door Result: " << (doorState == ccos::vehicle::HTriState::TRUE ? "Open" : "Closed");
        cout << endl;
    } else {
        cout << "isDoorOpened did not return OK. Actual return: " << HResultToString(doorOpenedResult);
        cout << endl;
    }

    cout << "Finished door test";
    cout << endl;
}
All I had to do is… (Don’t do this)⌗
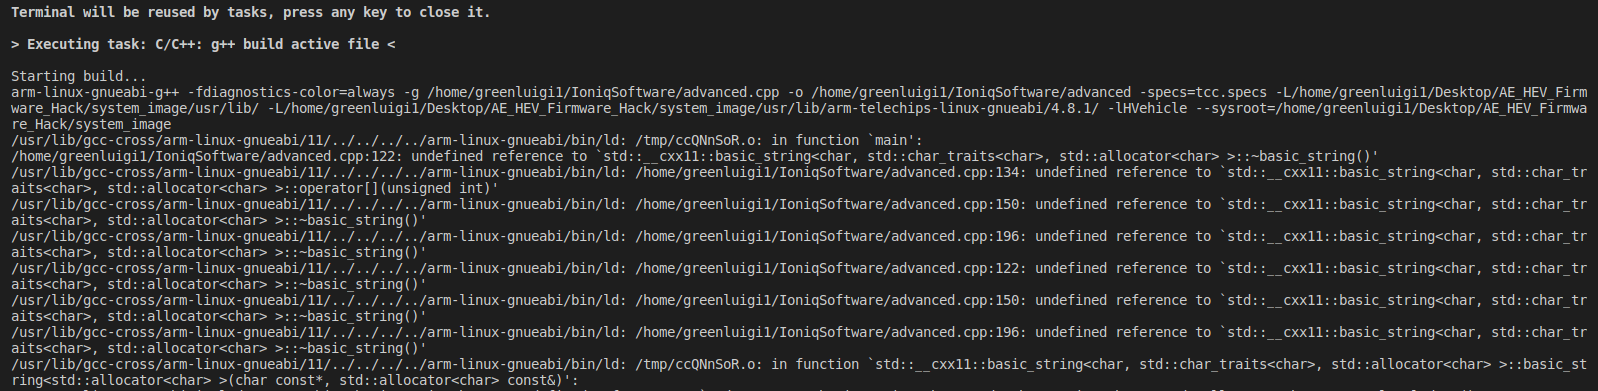
Now all I had to do is compile it. I setup VS Code with a bulid task that used the arm-linux-gnueabi-g++ compiler and set the system root to be the base of the mounted system.img file. I ran the task but it gave me an error.

Oops, yeah I am not used to C++ development and forgot to link to the HBody’s library. Turns out it is called HVehicle. I updated the build task to link it and…

Yeah I didn’t know C++ well enough for this. After a little bit of googling I found out that the std libraries that came with my compiler were too new and didn’t contain the specific version that HVehicle needed. I ended up making a specs file to avoid including the default library locations and manually included the /usr/lib/ and /usr/lib/arm-telechips-linux-gnueabi/4.8.1/ folders.
Running the build task one more time and…

Finally, a working (probably) build! I copied the resulting binary file to my usb drive and hopped in my car.
I fired up the reverse shell, copied the binary to the /tmp/ directory, marked it as executable and ran it.
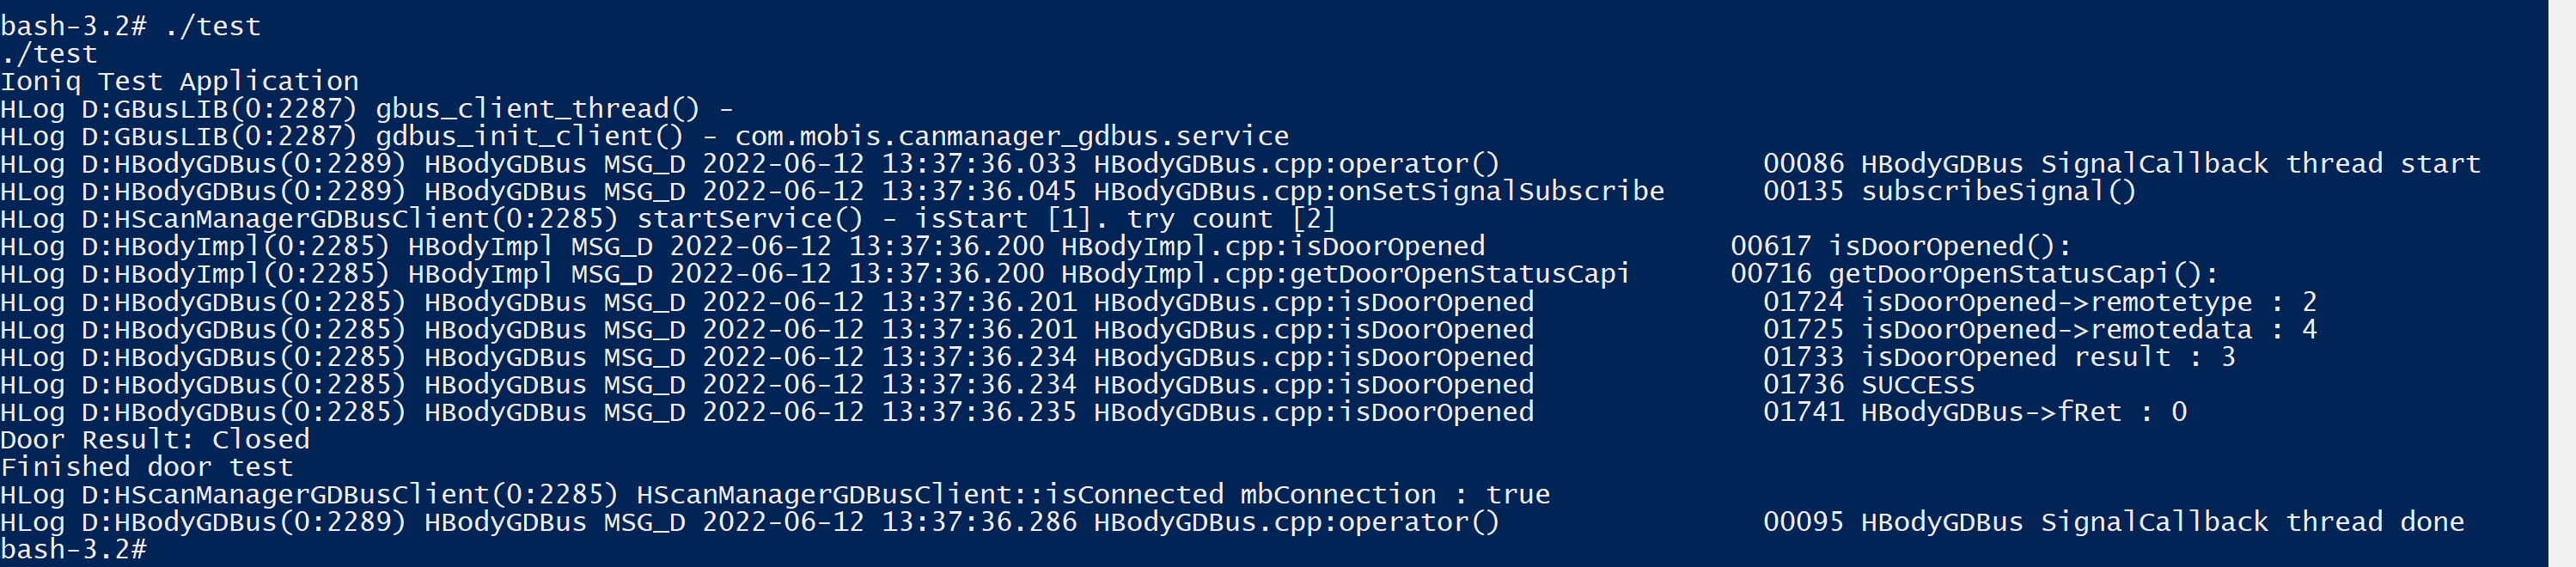
Ok, nice. There was a bit of log spam which appears to be comming from HBody, but it did correctly report the door was closed. I opened my door and ran it again and…
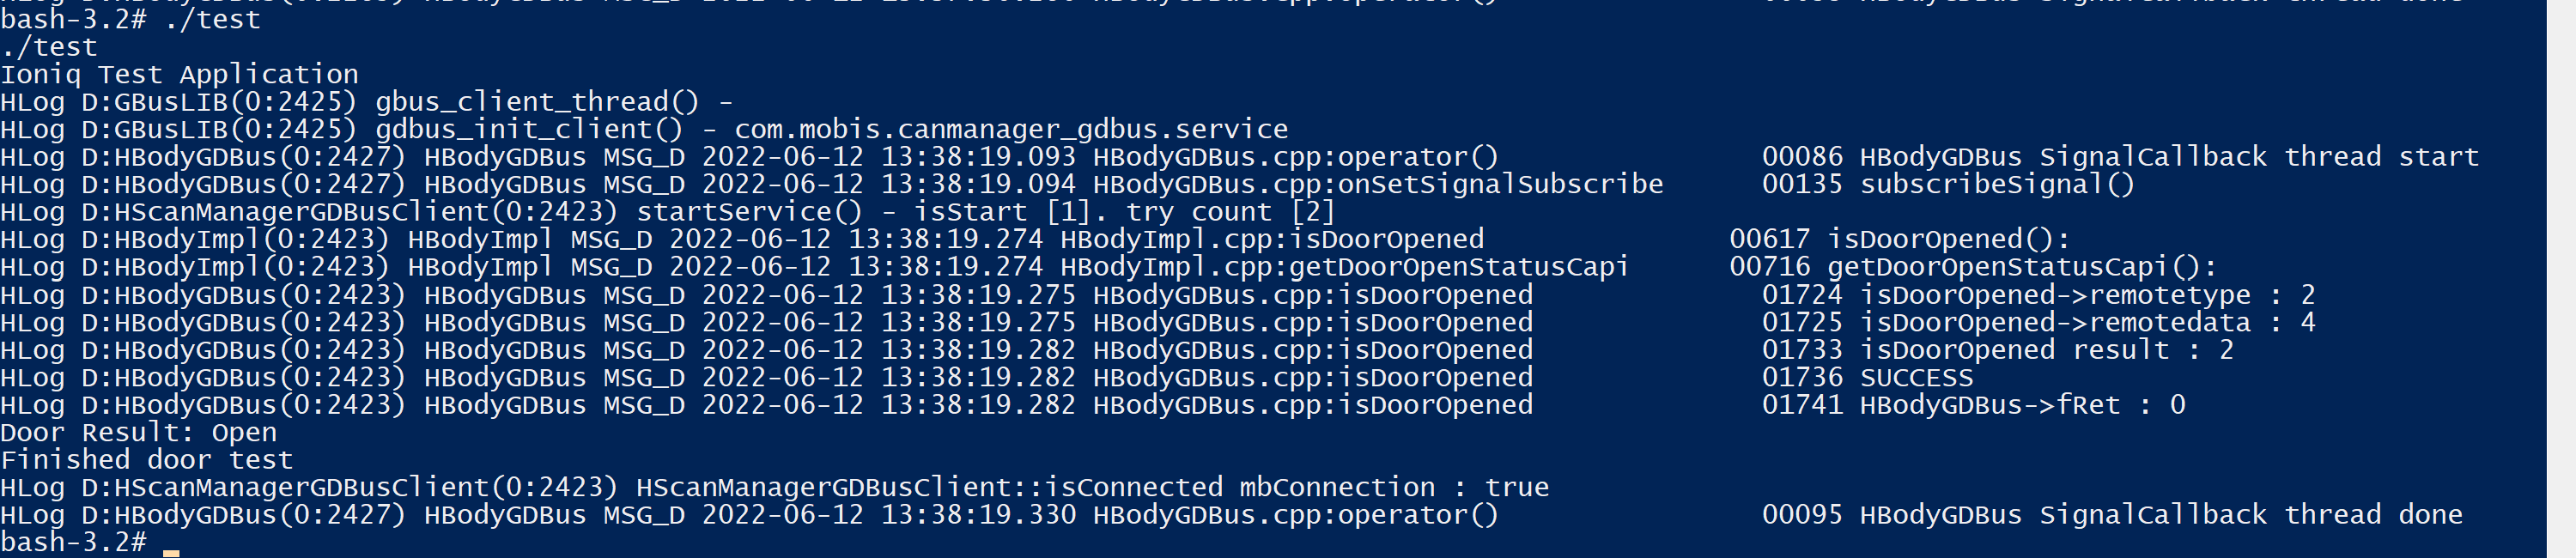
Yes! My beautiful app is working.
Now time for something a little more complicated.
#include <iostream>
#include <string>
#include "HBody.h"
#include "HChassis.h"
using namespace std;
namespace ccOSUtils
{
const char *HTriStateToString(ccos::vehicle::HTriState state)
{
switch (state)
{
case ccos::vehicle::HTriState::FALSE:
return "False";
case ccos::vehicle::HTriState::TRUE:
return "True";
case ccos::vehicle::HTriState::INVALID:
return "INVALID";
case ccos::vehicle::HTriState::MAX:
return "MAX";
default:
return "Other";
}
}
const char *HResultToString(ccos::HResult result)
{
switch (result)
{
case ccos::HResult::INVALID:
return "Invalid";
case ccos::HResult::OK:
return "OK";
case ccos::HResult::ERROR:
return "ERROR";
case ccos::HResult::NOT_SUPPORTED:
return "NOT_SUPPORTED";
case ccos::HResult::OUT_OF_RANGE:
return "OUT_OF_RANGE";
case ccos::HResult::CONNECTION_FAIL:
return "CONNECTION_FAIL";
case ccos::HResult::NO_RESPONSE:
return "NO_RESPONSE";
case ccos::HResult::UNAVAILABLE:
return "UNAVAILABLE";
case ccos::HResult::NULLPOINTER:
return "NULLPOINTER";
case ccos::HResult::NOT_INITIALIZED:
return "NOT_INITIALIZED";
case ccos::HResult::TIMEOUT:
return "TIMEOUT";
case ccos::HResult::PERMISSION_DENIED:
return "PERMISSION_DENIED";
case ccos::HResult::ALREADY_EXIST:
return "ALREADY_EXIST";
case ccos::HResult::SOME_UNAVAILABLE:
return "SOME_UNAVAILABLE";
case ccos::HResult::INVALID_RESULT:
return "INVALID_RESULT";
case ccos::HResult::MAX:
return "MAX";
default:
return "Other";
}
}
}
int main(int argc, char *argv[])
{
cout << "Ioniq Advanced Test Application" << endl;
if (argc == 1)
{
cout << "Provide at least 1 argument (doorStatus, doorLock, status, test)" << endl;
return 0;
}
ccos::vehicle::general::HBody *body = ccos::vehicle::general::HBody::getInstance();
string command = argv[1];
if (command == "doorStatus")
{
if (argc != 3)
{
cout << "Expected arguments: doorStatus {fl/fr/rl/rr}" << endl;
return 0;
}
string doorStr = argv[2];
ccos::vehicle::HDoorPosition doorPosition = ccos::vehicle::HDoorPosition::FRONT_LEFT;
if (doorStr == "fl")
{
doorPosition = ccos::vehicle::HDoorPosition::FRONT_LEFT;
}
else if (doorStr == "fr")
{
doorPosition = ccos::vehicle::HDoorPosition::FRONT_RIGHT;
}
else if (doorStr == "rl")
{
doorPosition = ccos::vehicle::HDoorPosition::REAR_LEFT;
}
else if (doorStr == "rr")
{
doorPosition = ccos::vehicle::HDoorPosition::REAR_RIGHT;
}
ccos::vehicle::HTriState doorState;
ccos::HResult doorOpenedResult = body->isDoorOpened(doorPosition, doorState);
if (doorOpenedResult == ccos::HResult::OK)
{
cout << "Door Result: " << (doorState == ccos::vehicle::HTriState::TRUE ? "Open" : "Closed");
cout << endl;
}
else
{
cout << "isDoorOpened did not return OK. Actual return: " << ccOSUtils::HResultToString(doorOpenedResult);
cout << endl;
}
}
else if (command == "doorLock")
{
if (argc != 3)
{
cout << "Expected arguments: doorLock {true/false}" << endl;
return 0;
}
string shouldBeLockedStr = argv[2];
ccos::HBool shouldBeLocked = false;
if (shouldBeLockedStr[0] == 't')
{
shouldBeLocked = true;
}
cout << "Setting Door Locks to: " << (shouldBeLocked ? "Locked" : "Unlocked") << endl;
ccos::HResult doorLockResult = body->requestDoorLock(shouldBeLocked);
if (doorLockResult == ccos::HResult::OK)
{
cout << "Door Lock Success" << endl;
}
else
{
cout << "Door Lock Failure: " << ccOSUtils::HResultToString(doorLockResult) << endl;
}
}
else if (command == "status")
{
ccos::vehicle::general::HChassis *chassis = ccos::vehicle::general::HChassis::getInstance();
ccos::HFloat odometerReading = 0;
chassis->getOdometer(odometerReading);
ccos::HFloat batteryVoltage = 0;
chassis->getBatteryVoltage(batteryVoltage);
ccos::HUInt8 percentBatteryRemaining = 0;
chassis->getRemainBattery(percentBatteryRemaining);
cout << "Vehicle Status:" << endl;
cout << "\tOdometer: " << odometerReading << endl;
cout << "\tBattery Voltage: " << batteryVoltage << "V" << endl;
cout << "\tBattery Remaining: " << percentBatteryRemaining << "%" << endl;
}
else if (command == "test")
{
cout << "Testing methods that might not work" << endl;
ccos::HResult testResult;
cout << "\tTesting Wireless Charging Pad State" << endl;
ccos::HUInt8 wirelessChargingPadState = 0;
testResult = body->getWirelessChargingPadState(wirelessChargingPadState);
cout << "\t\t" << ccOSUtils::HResultToString(testResult) << " - State: " << wirelessChargingPadState << endl;
cout << "\tTesting Window State (Driver)" << endl;
ccos::vehicle::HWindowType windowType = ccos::vehicle::HWindowType::DRIVER;
ccos::vehicle::HTriState windowState;
ccos::HUInt8 windowDetail;
body->getWindowOpenState(windowType, windowState, windowDetail);
cout << "\t\t" << ccOSUtils::HResultToString(testResult) << " - State: " << ccOSUtils::HTriStateToString(windowState) << "Detail?: " << windowDetail << endl;
cout << "Completed testing methods that might not work" << endl;
}
else
{
cout << "Unknown Command" << endl;
}
cout << "Completed" << endl;
return 0;
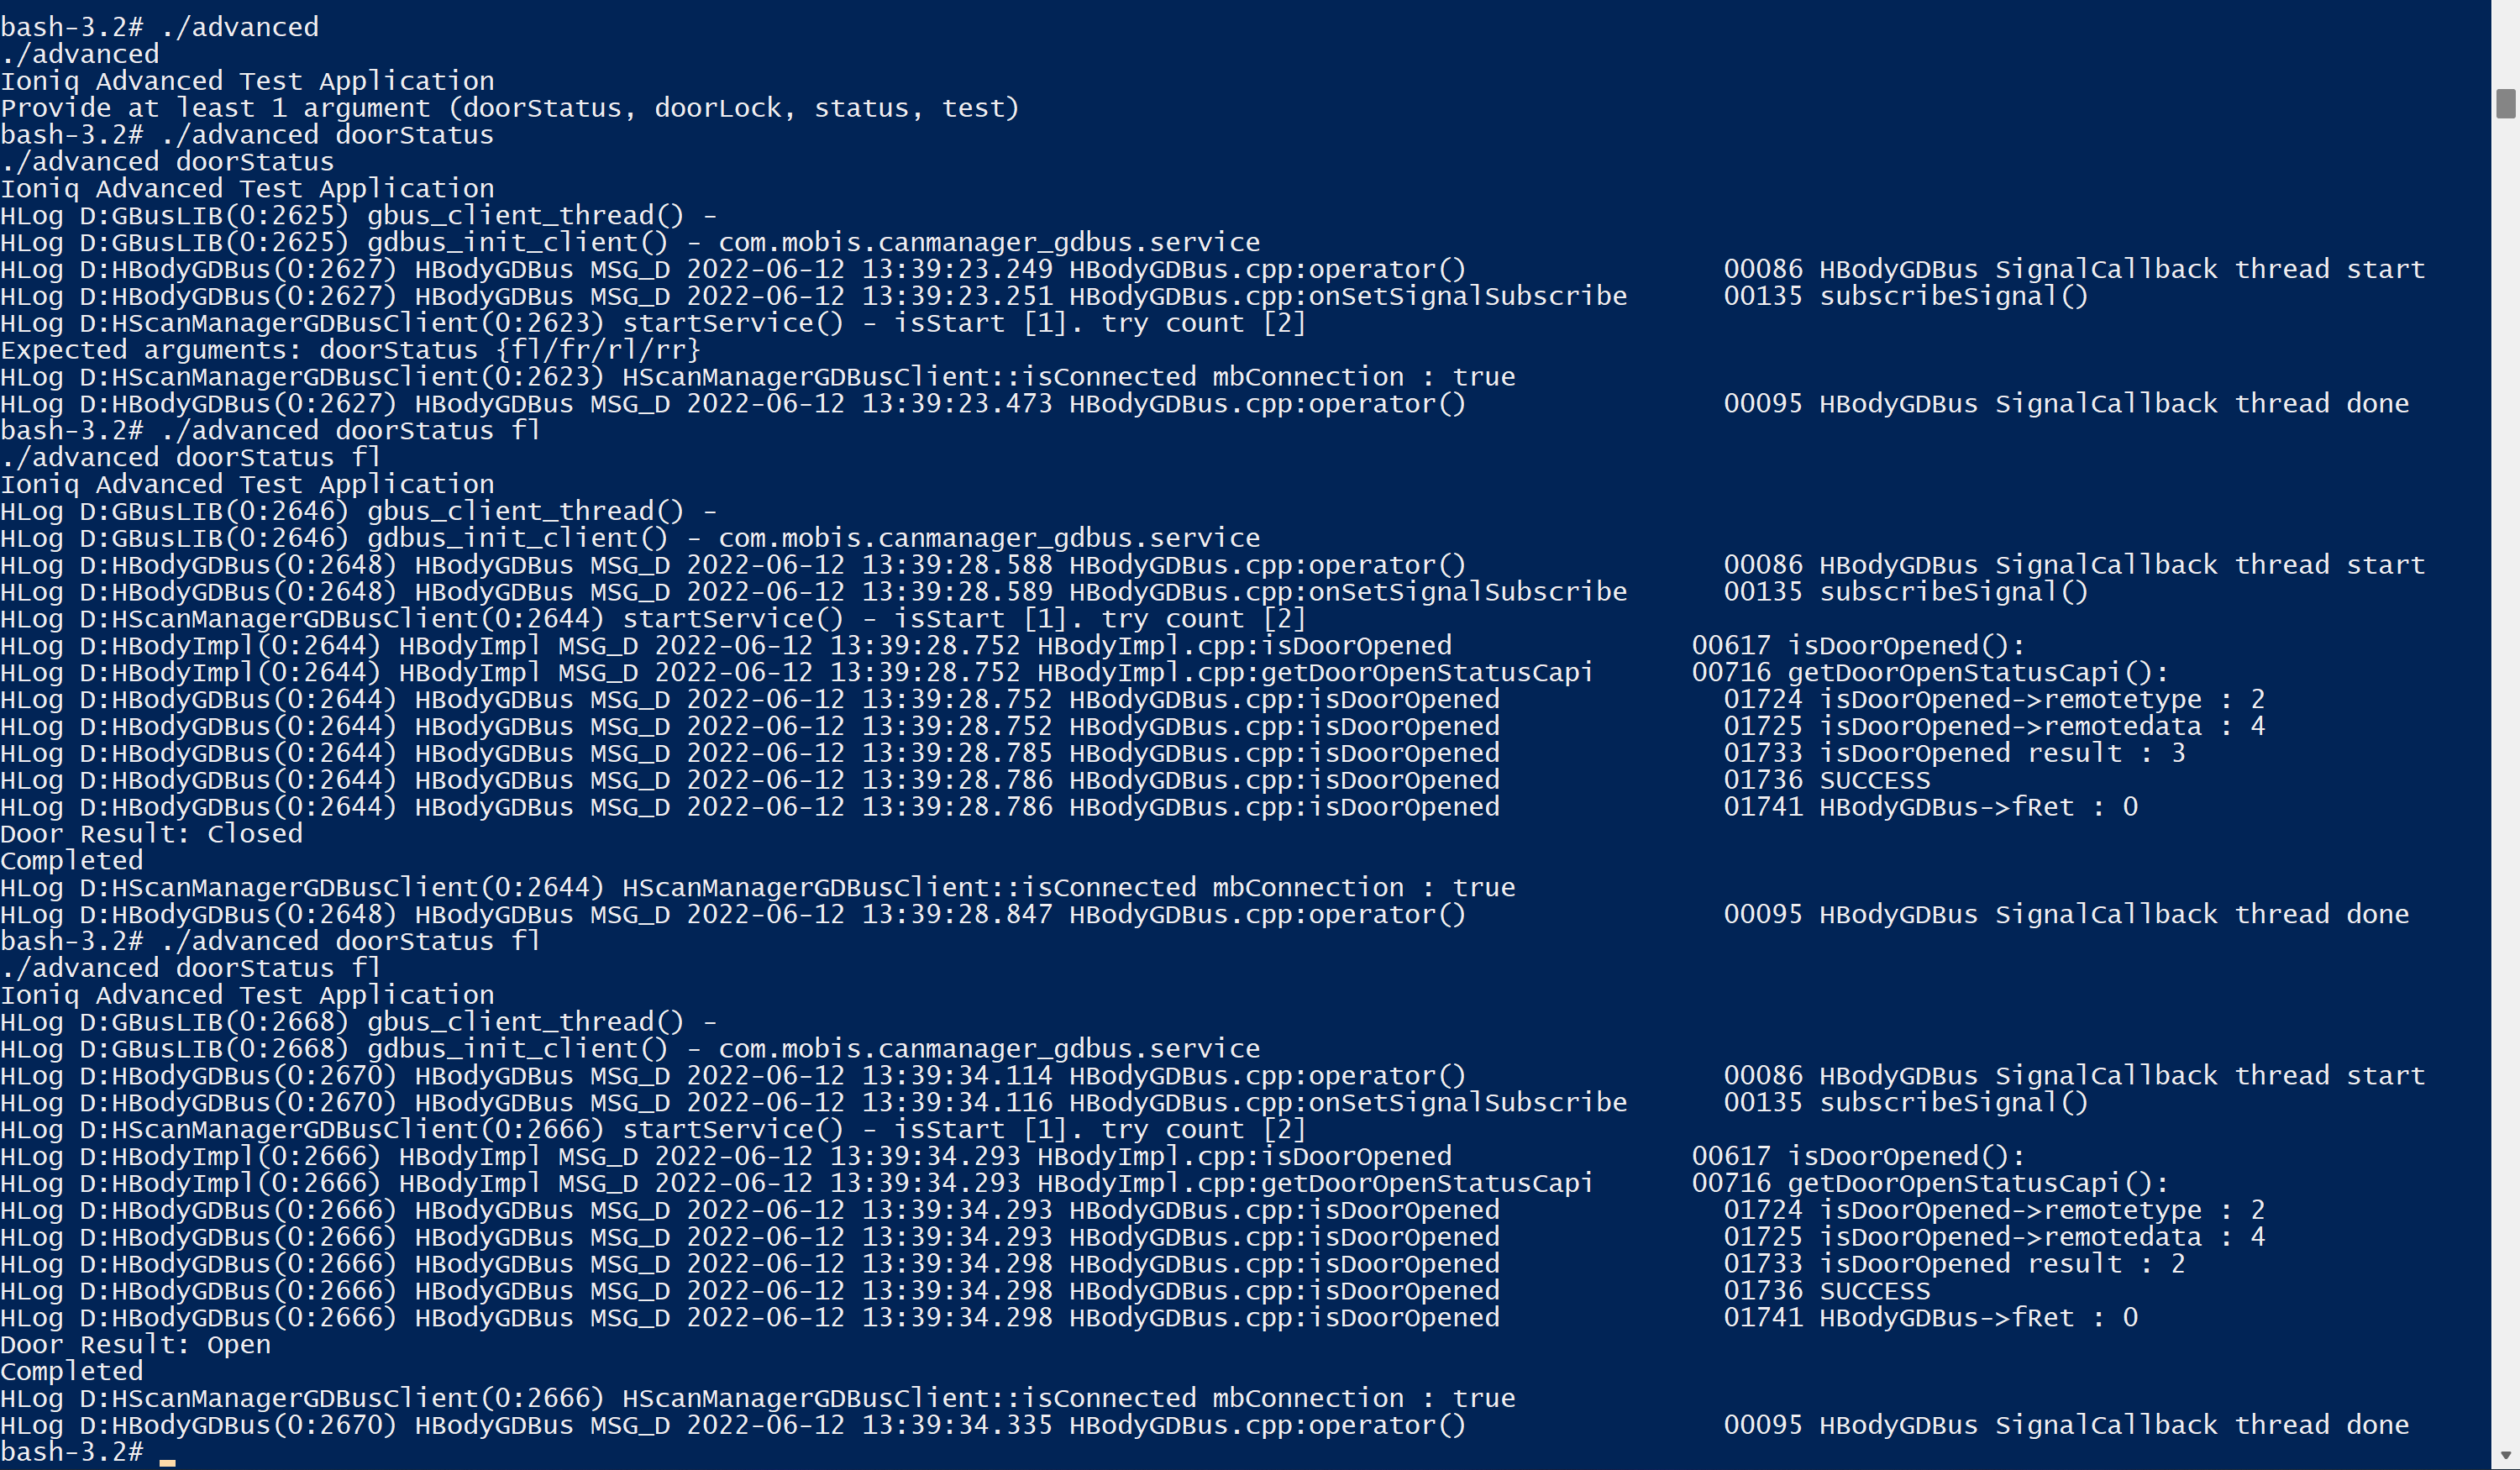
}I made a more advanced application which allowed me to query specific doors, lock or unlock the doors, read some basic stats from the car, and test some methods that may not work (They were under a section in the header file which had a comment saying: “// uncompleted” :/)
Well, back into VS Code, run the build task and boom!
Oh, well something went boom. I again had no idea what it was erroring on, back to Google I went. This one was a bit of a pain, but eventually I found out that the libraries were using an old ABI, but luckily the fix was easy. All I had to do was put “-D_GLIBCXX_USE_CXX11_ABI=0” into my compiler arguments.
It finally compiled, I threw it on the IVI and it worked! I was able to run my door queries, lock and unlock the doors, and run my tests. (The functions were in fact uncompleted)
GUI⌗
Since I completed the basic command line program, it was time for me to take on a GUI application. I spent a ton of time trying to perform workarounds for certain things, but it was all very unecessary. So I am going to document here what actually worked.
Through my reverse engineering and research I knew that all of the GUI applications in the system were Qt5 based and used Helix, an application manager system developed by Wind River Systems. If I wanted to make a GUI based application that definitely worked, I would need to fully incorperate it into the Helix system like all of the other apps.
Getting Qt Ready⌗
To be able to compile a Qt5 application I needed to get a working Qt compiler setup first. I spent way too much time trying to avoid compiling Qt myself, but it was the simplest and easiest path in the end.
To get Qt5 set up correctly I first installed g++, then I grabbed Qt 5.7.1 and extracted it, I wanted to setup Qt5 for ARM cross compiling, so I also downloaded and installed GCC 4.9.4 from Linaro. I used Qt 5.7.1 because I discovered the native apps on my IVI used Qt 5.7 and were compiled with GCC around version 4.9. I wanted to make the compilation of my own apps as seamless as possible, so I used as close of versions as I could while still having the latest patches before compatibility would break.
I then attempted to compile Qt5, a few times in fact but I was plagued with different errors each time. Once of the first errors I found was that Qt was installing various files into my IVI’s mounted system root image, but the image by default does not have the space to fit them. I used the following commands to increase the size of system.img by 1GB using dd and then resize the filesystem within system.img to be able to use the newly added space with resize2fs:
dd if=/dev/zero count=4 bs=256M >> system.img

sudo mount system.img system_image

FULL_SYSROOT_DIR=$(realpath system_image)
SYSROOT_MOUNT_DEVICE=$(df | grep $FULL_SYSROOT_DIR | awk '{print $1}')
sudo resize2fs $SYSROOT_MOUNT_DEVICE
I also encountered a couple of other errors, one related to missing libGLESv2, which I was able to fix by adding a symlink within the system image so Qt could find it.
cp system_image/usr/lib/libGLESv2.so.2 system_image/usr/lib/libGLESv2.soThe next errors were due to it not being able to compile QtQuick, I wasn’t entirely sure on how to fix it, it appeared most people who gets this error online simply skip compiling QtQuick, so that is what I did too. Finally I also had to skip compiling the virtualkeyboard module because it also failed to compile. After fixing these issues I had my mess of a configure command:
./configure -device arm-generic-g++ -device-option CROSS_COMPILE=/home/greenluigi1/QtDev/gcc-linaro-4.9.4-2017.01-x86_64_arm-linux-gnueabi/bin/arm-linux-gnueabi- -opensource -confirm-license -sysroot /home/greenluigi1/QtDev/system_image -skip declarative -nomake examples -skip virtualkeyboard After it configured I ran “gmake -j4” and waited while Qt compiled. Luckily, it worked and I was able to run “gmake install”.
Automating It⌗
Once I knew everything worked, I created a couple of scripts to do most of the complicated setup. So if I need to setup a development environment in the future, all I needed to do is extract the scripts to a new folder, copy an unmodified system.img file to the same folder, and then run setupDevelopmentEnvironment.sh.
The script will download and install the correct cross compilers, QtCreator, & compile the correct version of Qt. Since the mounting of the system.img is temporary, I also included the mount script so it is easy to remount the system image after reboot and before development.
Now I was in the homestretch, I just needed to set up QtCreator to use my setup.
QtCreator⌗
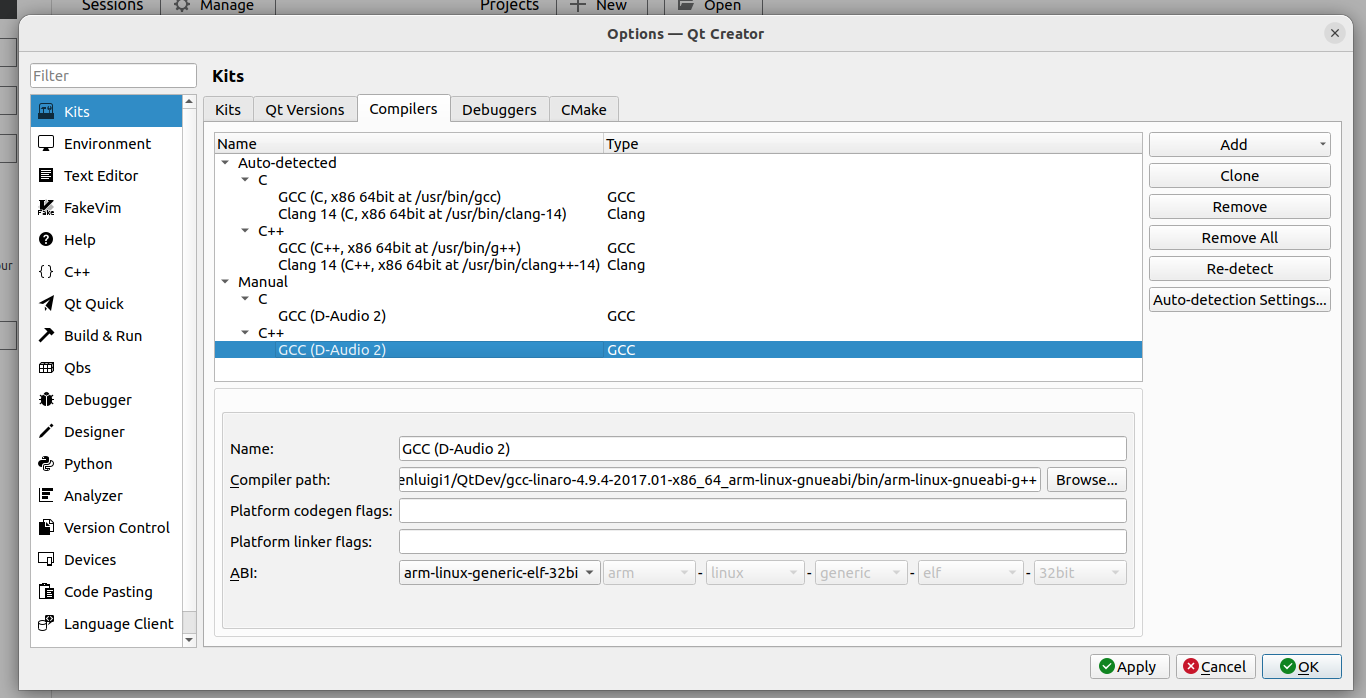
QtCreator is the IDE used to develop Qt applications. I installed the latest version from apt and started configuring it for D-Audio compilation.
Within QtCreator’s settings I setup two compilers, one for C and one for C++ and pointed them to the GCC install from Linario I extracted earlier.
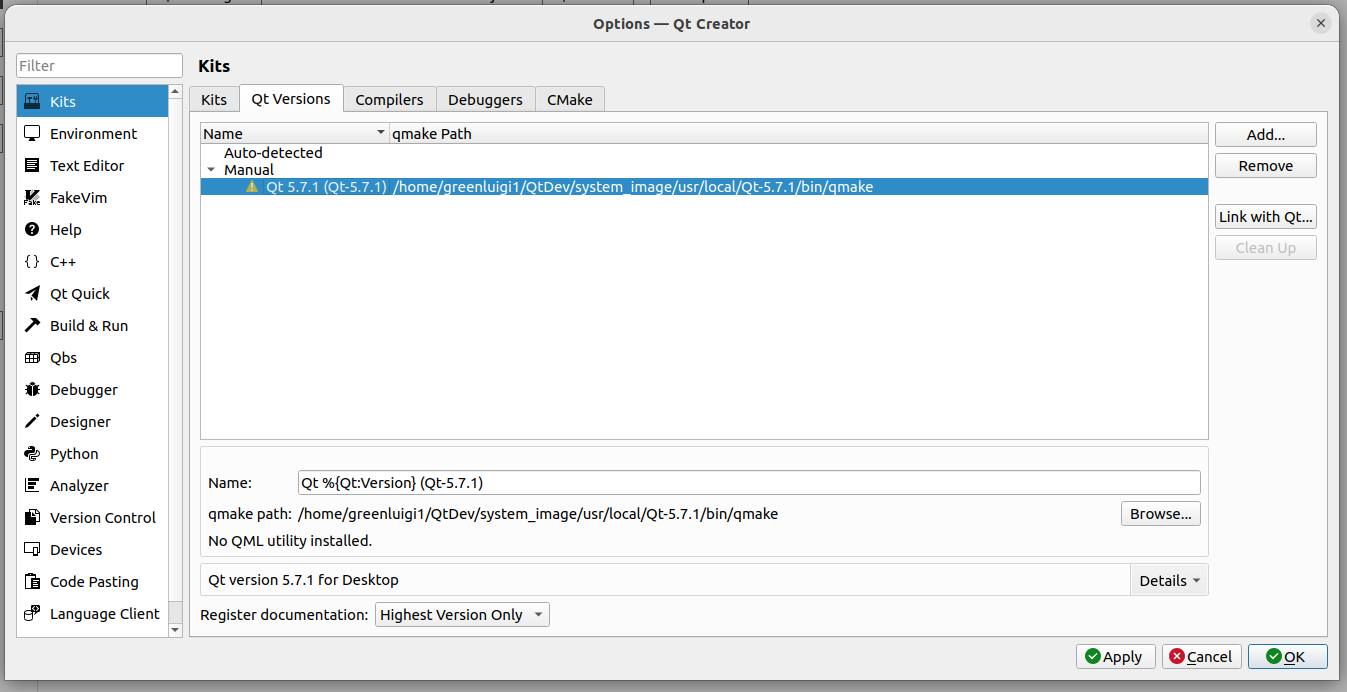
I then added my Qt installation in the Qt Versions tab by pointing it to the qmake file within my IVI’s system image root.
And I wrapped it all up by adding a new kit called D-Audio 2 and pointing the settings to use my specific Qt Version and compilers.
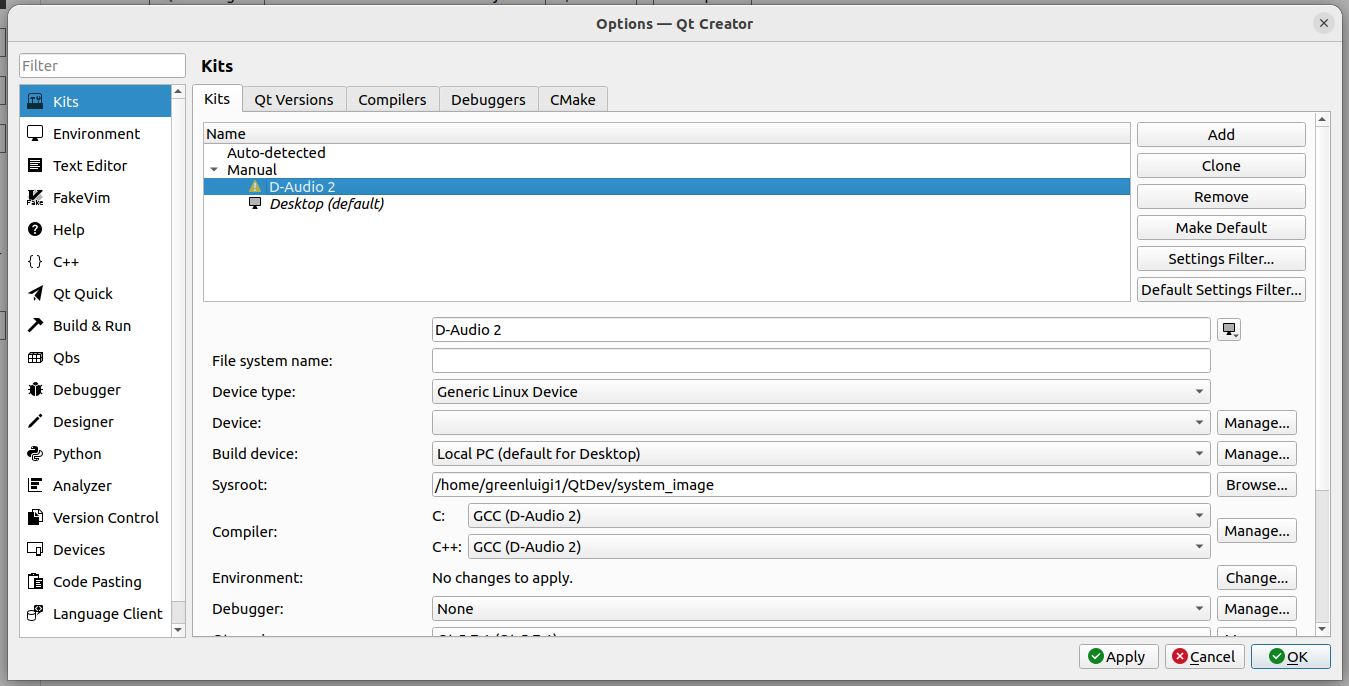
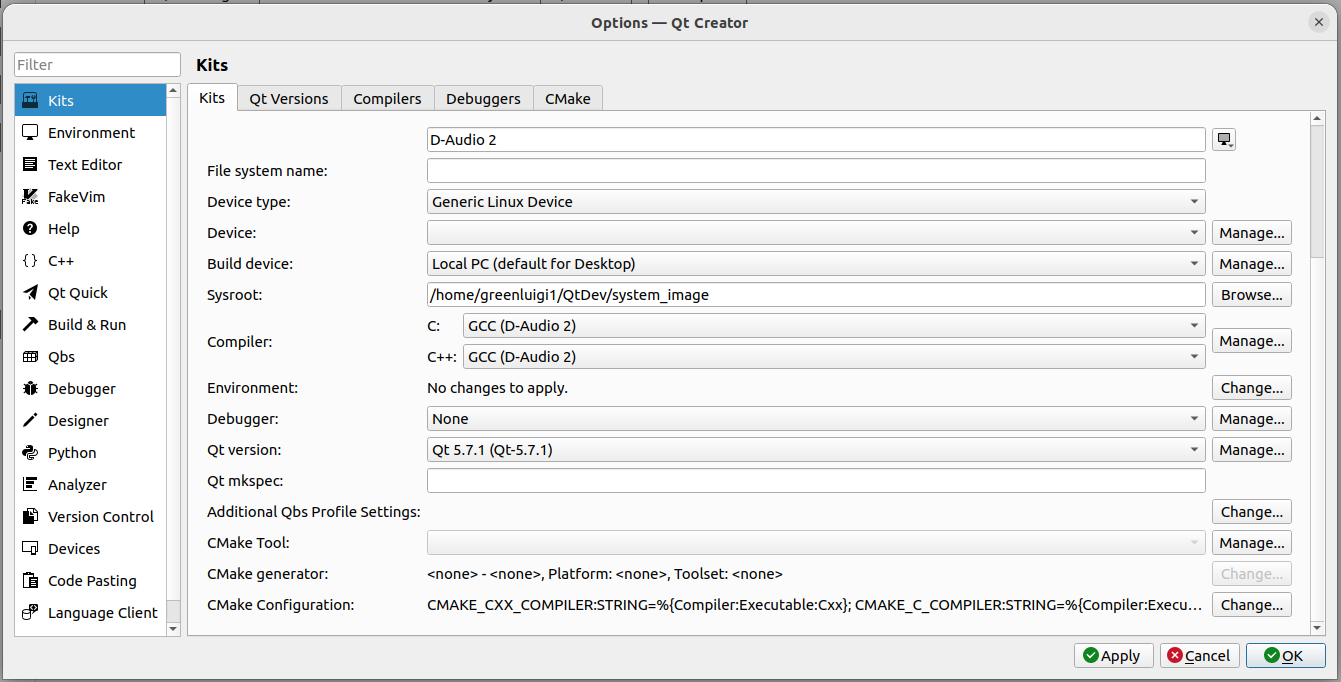
I was now ready to develop GUI application for my IVI.
Not Yet⌗
Well, I was almost ready. I still had to figure out how to incorperate my app within the application manager, Helix. So I went to do some more reverse engineering. I decided to try to find the simplest app in the system I could find and mimic how it was set up.
I looked through all of the GUI apps in the system and looked for the smallest ones. I settled on EProfilerApp that was found in /usr/share/AMOS/EProfilerApp. It was a simple GUI app which based on the name is used to view/manage AMOS, the built in system profiling tool. I imported EProfilerApp into IDA and:
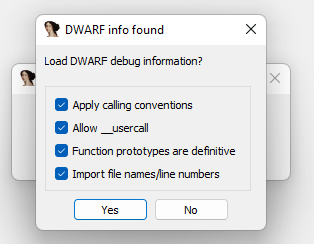
EProfilerApp still had its debug information left in! Because of this, it was relatively easy to reverse engineer it. Here is what I discovered:
Every Helix App’s main() function looks like this:
int main(int argc, char *argv[])
{
    QApplication app(argc, argv);
    MyApplication myApplication = MyApplication();
    myApplication.init(app, argc, argv);

    return app.exec();
}
QApplication is the normal QApplication class from Qt5 and is initialized like a normal Qt5 app. Then an instance of the app’s Helix application is created, in this case MyApplication. MyApplication inherits from Helix’s ApplicationQt/Application classes. The only responsibility of an app’s Application class is to create components for Helix to manage.
There are 3 different types of components in Helix:
- App Views
- Represents a Qt5 screen/window that has controls a user can interact with. This includes full screen windows as well as popups.
- Is in charge of creating, showing, hiding, & destroying a normal Qt5 window.
- App Services
- Represents a background process.
- Event Receivers
- Represents a handler for the various events which can be emitted throughout the system.
Each component has its own name, which follows a Java-package style naming convention (Ex: com.mobis.caudio.setupApp.SetupAppView). Helix calls into the app’s Application class and passes in the name of the component. The Application class then checks the name and creates/returns the correct AppView/AppService/EventReceiver or nullptr if the name was not valid.
Hello World But With Buttons⌗
It was now time to actually make a GUI application. The source code for this application can be found here.
The application features a single AppView, creatively called “ExampleGuiAppView”, the component name of it is “com.greenluigi1.guiExample.TestAppView”. This AppView creates a simple window with 4 buttons:
- Lock
- Locks all of the doors in the vehicle.
- Unlock
- Unocks the doors in the vehicle.
- Acts like the unlock of the key fob. Once press will unlock the driver’s side, two will unlock all doors.
- Test
- Prints a test message to the Logcat log.
- Exit
- Exits the application using the finish() function.
I built it and it compiled successfully. Now it was time to get it running on the real hardware.
There were a couple of things I needed to do before this though. We need to “register” the application so Helix can see it. Helix’s application manager works by reading ini files from the /etc/appmanager/appconf directory. Each ini file tells Helix the application’s component name, lists each AppView, AppService, & EventReceiver, as well as states what events your EventReceivers listen to.
A standard application config looks like this:
[Application]
Name=com.company.grouping.appName
Exec=/usr/share/app-appName-1.0.0/appName

[TestAppService]
#ComponentName : com.company.grouping.appName.TestAppService
Type=AppService

[TestAppView]
#ComponentName : com.company.grouping.appName.TestAppView
Type=AppView

[TestEventReceiver]
#ComponentName : com.company.grouping.appName.TestEventReceiver
Type=EventReceiver
Event=com.mobis.caudio.ACTION.POWER_OFF
Each .appconf file begins with an group called: “[Application]” under it, the base package Name of the application is set. This lets Helix know that if an application requests to create a component starting with that package name, it will be directed to your app. Then Exec is set, which is the location of the executable file itself.
After the “[Application]” group, any number of groups can follow. Each group represents a new component. The name of the group indicates the name of the component, for example “[TestAppView]” means it is defining a component called “TestAppView”, or in this case more specifically: “com.company.grouping.appName.TestAppView”. Under the component group is the specific settings for the component. Every component group has a Type which is either AppView, AppService, or EventReceiver. Each type of component can have its own settings, for example the EventReceiver type has the Event property which is a comma seperated list of events the Receiver is subscribing to. The lines which start with a “#” are comments and are ignored by Helix.
I just needed to make my own .appconf file so I could launch my application. This is what I came up with:
[Application]
Name=com.greenluigi1.guiExample
Exec=/appdata/guiExample

[TestAppView]
# ComponentName : com.greenluigi1.guiExample.TestAppView
Type=AppView
It defines an application called “com.greenluigi1.guiExample” that is located at /appdata/guiExample" that contains a single AppView called “com.greenluigi1.guiExample.TestAppView”. Now I just needed to install the app on my car and run it.
I copied my compiled application and its config file onto my USB drive and loaded up my reverse shell. I mounted the root as read/write so I could modify the config folder. Then I copied my GuiExampleApp.appconf config file into the /etc/appManager/appconf/ folder and copied the application itself to the /appdata/ folder.
I then sent the reboot command and waited for the IVI to come back up.
Now I just had to launch my application, but how could I do that? The application doesn’t do anything on its own running it from the command line. We need to tell Helix to launch it.
Luckily, during my earlier investigations I found out a command line tool that was already installed on the machine that does this: appctl. appctl is a small program which allows you to:
- Start an App View/App Service
- Usage: appctl startAppView {componentName} [args…]
- Usage: appctl startAppService {componentName} [args…]
- Finish an App View/App Service
- Usage: appctl finishAppView {componentName}
- Usage: appctl finishAppService {componentName}
- Emit an Event
- Usage: appctl emitEvent {event} [args…]
So all I needed to do was run:
appctl startAppView com.greenluigi1.guiExample.TestAppView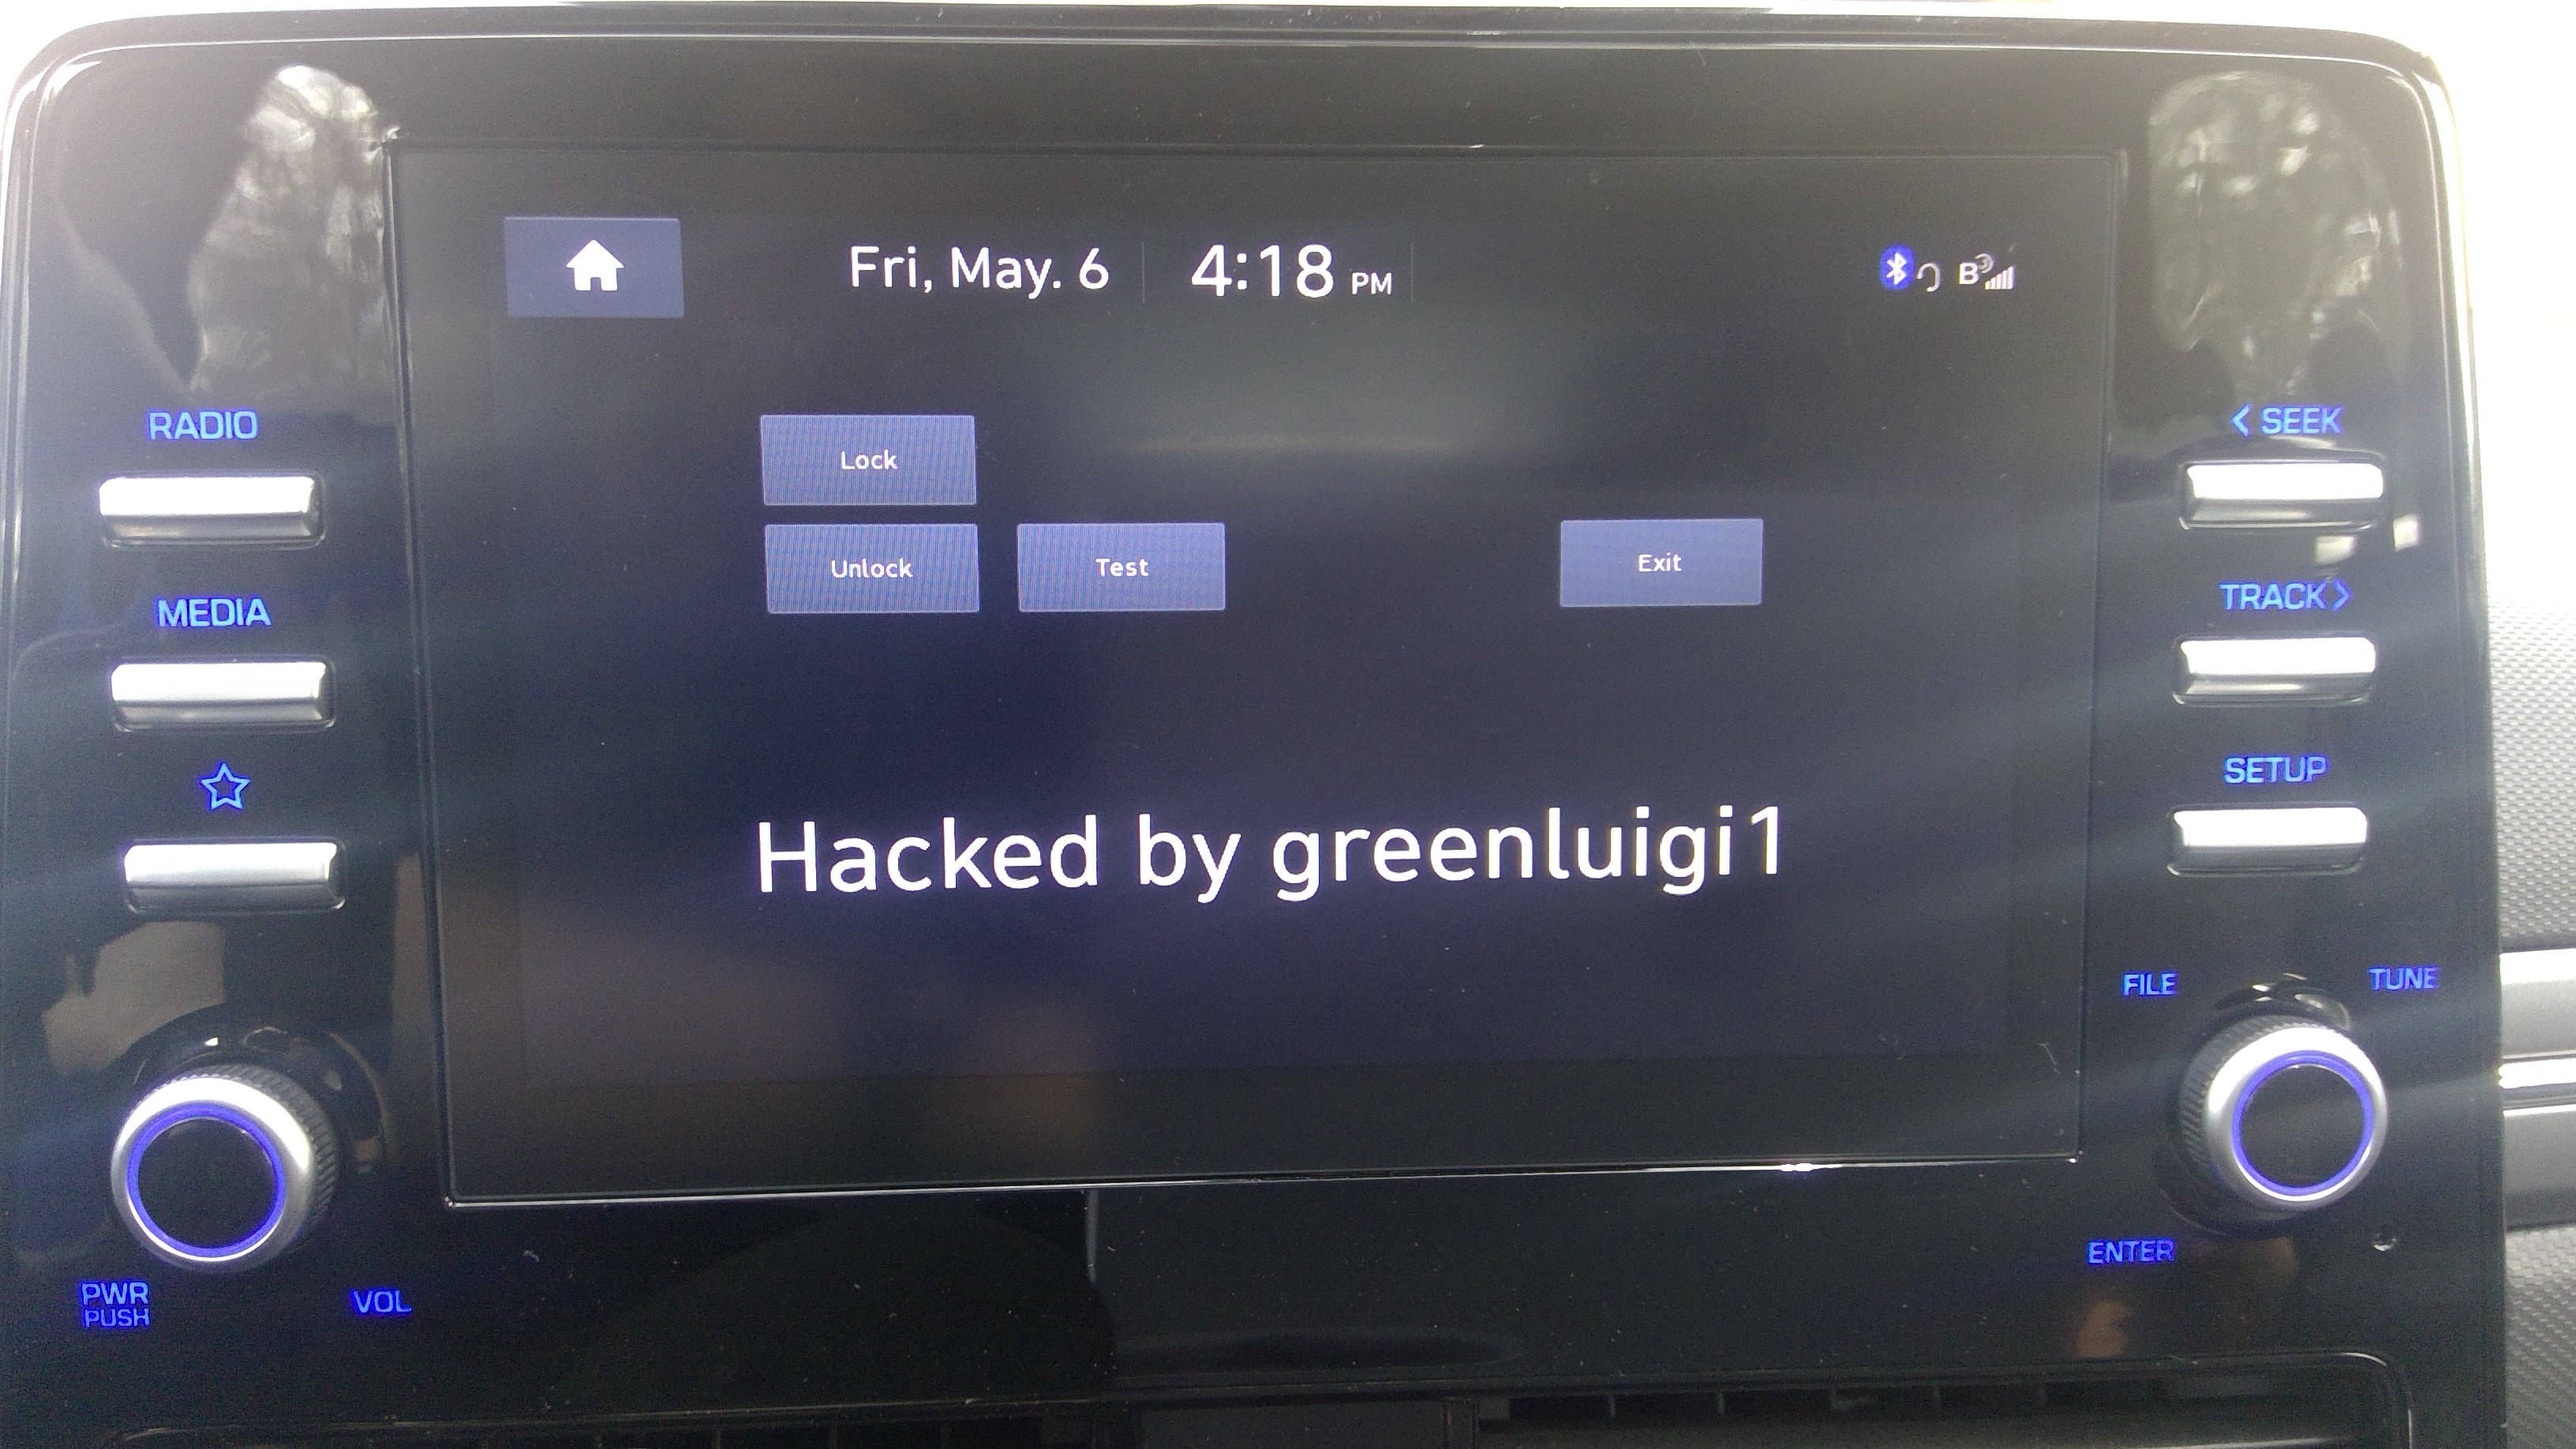
Bingo! My app was running. The buttons also worked flawlessly, allowing me to lock or unlock my doors. I also dumped the logs after exiting my app and saw that my test button log and other debug log entries were successfully written in the Logcat file.
I now had full control over my car’s IVI, which is certainly a nice feeling. There is still more to be learned about the system though and I might make more posts about it as I find out more information.