How I Hacked my Car
Note: As of 2022/10/25 the information in this series is slightly outdated. See Part 5 for more up to date information.
The Car⌗
Last summer I bought a 2021 Hyundai Ioniq SEL. It is a nice fuel-efficient hybrid with a decent amount of features like wireless Android Auto/Apple CarPlay, wireless phone charging, heated seats, & a sunroof.
One thing I particularly liked about this vehicle was the In-Vehicle Infotainment (IVI) system. As I mentioned before it had wireless Android Auto which seemed to be uncommon in this price range, and it had pretty nice, smooth animations in its menus which told me the CPU/GPU in it wasn’t completely underpowered, or at least the software it was running wasn’t super bloated.
As with many new gadgets I get, I wanted to play around with it and ultimately see what I could do with it.
The Goal⌗
The IVI in the car, like many things these days, is just a computer. My goal was to hack the IVI to get root access and hopefully be able to run my own software on it. Of course, the first step in hacking a device like this is research.
Some of the obvious things that I looked up were:
- What is the device running?
- There are two versions of the IVI, the navigation one that runs Android, and a Linux based one.
- Has anyone else hacked this before?
- The Android based, navigation version is easy to hack by installing your own APKs through the engineering menu.
- The linux based one has not been hacked.
- Does the non-navigation IVI have an Engineering Mode?
Enginering Mode⌗
I love developer settings and test apps. There is usually tons of fun to be had playing around with them. I thought I might even get lucky and it would have an option to enable an SSH server or the like.
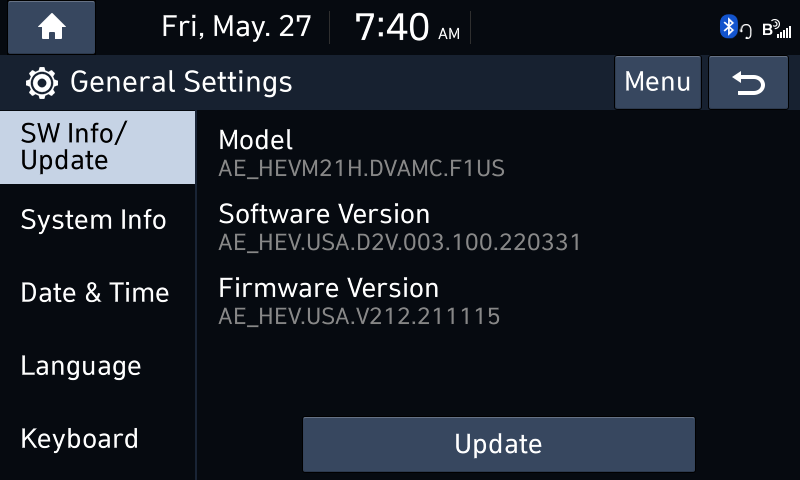
I figured out with my IVI that I could enter its Engineering Mode by going to the Software Update screen, quickly pressing to the left of the Update button 10 times, and then once to the right of the button.
 If a screen didn’t appear right away the presses would just be repeated until it worked.
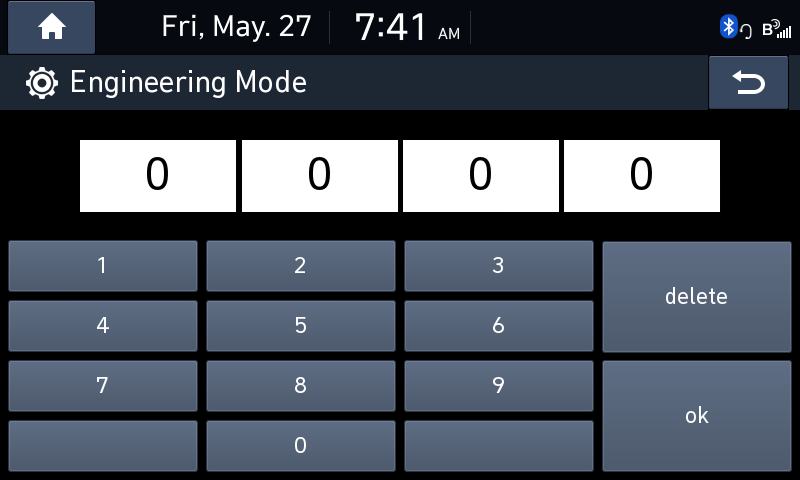
The Engineering Mode was secured by a 4 digit pin. This guide helped my figure out the pin was “2400”.
Upon entering the Enginering Mode I scrubbed through the menus looking at all of the available options. There were a ton of diagnostics, debug readouts, and hidden settings. A few of the menus caught my eye:
- USB copy
- This menu had suboptions to copy logs to a USB drive or update individual parts of the system from a USB.
- One of the options indicated holding the “Radio” button on the IVI would trigger log collection too.
- Module Info > ISV Setting
- This menu had an ADB TCP option, as well as radio buttons for “SW Test Tools”.
Using these settings I gathered a bunch of logs onto my USB drive and attempted to use ADB to connect to the IVI.
ADB TCP⌗
I connected my phone with wireless Android Auto to get on the IVI’s Wi-Fi network and tried to port scan the device, but I was not able to find any open ADB port. :( I eventually found out this settings doesn’t really do anything.
The Logs⌗
The logs turned out to be a treasure trove of information on how the IVI works under the hood.
The logs are transfered to the USB in one big tar.gz named “daudio2.0v_{Date}-{Time}.tar.gz”.

The archive contains many files including the kernel log, output of the “top” command, logcat logs, and the logs from BlueLink.
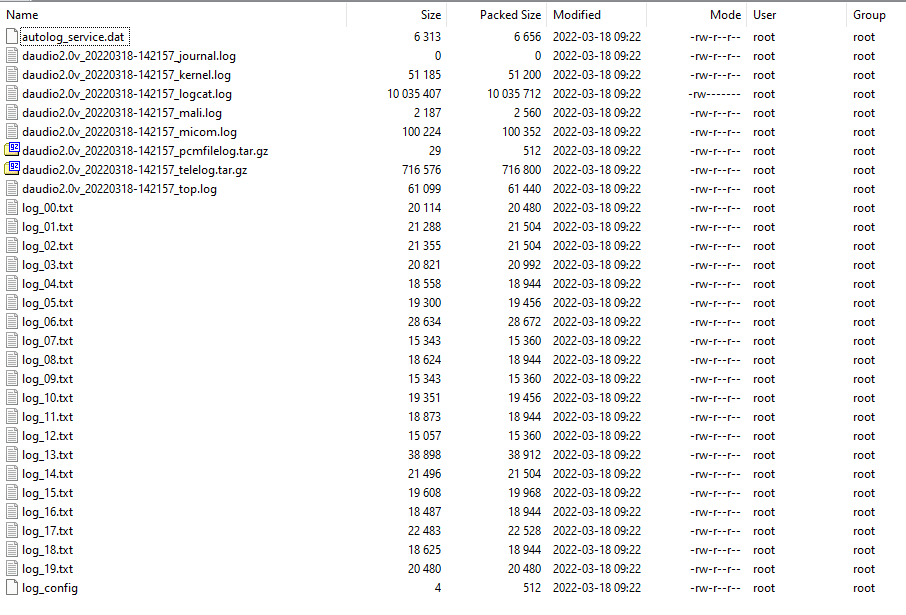
The most interesting of the log files is the logcat file. Basically every application running on the IVI is heavily logged, and all of it is piped to this file.
Hacking It⌗
At that point, I knew getting into the system wasn’t going to be as easy as turning on a setting. I would need to actually exploit something to get access.
I decided the best way to figure out how to get in was to reverse engineer the applications running on the IVI. But to do that I needed the application’s files. I figured the easiest way to do that would be simply getting a firmware update and unpacking it.
The Firmware⌗
I ended up doing some more research and skimming through logs. I found out these IVIs run “D-Audio2V” by Hyundai Mobis. D-Audio2V is the second generation of Hyundai’s Display Audio OS and is used in a variety of vehicles from Hyundai and Kia. I found that Hyundai Mobis’s site had some of D-Audio2’s source code available to download. I skimmed through it, but most of it was just minor patches to various open source projects to get the Wi-Fi system to work. The firmware updates for D-Audio2 systems was found at update.hyundai.com under “Display Audio Software Update”. Unfortunately, there was not an update for my specific vehicle, so I just downloaded the updates for a couple of other vehicles instead.
The firmware files came in a simple .zip file that contained another zip file. The inner zip was named enc_system_package_{version}.zip. Looking inside the system_package zip, it appears it contained the firmware for the various modules in the IVI like the GPS and HD Radio, as well as the system image itself.
The update was looking promising, I attempted to extract the system image and
 The entire zip was encrypted.
I wasn’t totally discouraged though, I already had some tools on my PC like John The Ripper and Hashcat which could be used to brute force zip passwords. I attempted to brute force the password up to 8 characters since that is what my system could do in a reasonable amount of time, but that didn’t work. I also attempted to use some of my wordlists, but that also failed.
(bk)Cracking it⌗
At this point I started researching other tools or services I might be able to use. That was when I came across bkcrack. Apparently traditional zip encryption can be broken using a known-plaintext attack. This means if I could find at least 12 bytes of one of the files that is inside the encrypted zip, I could potentially unencrypt the entire zip.
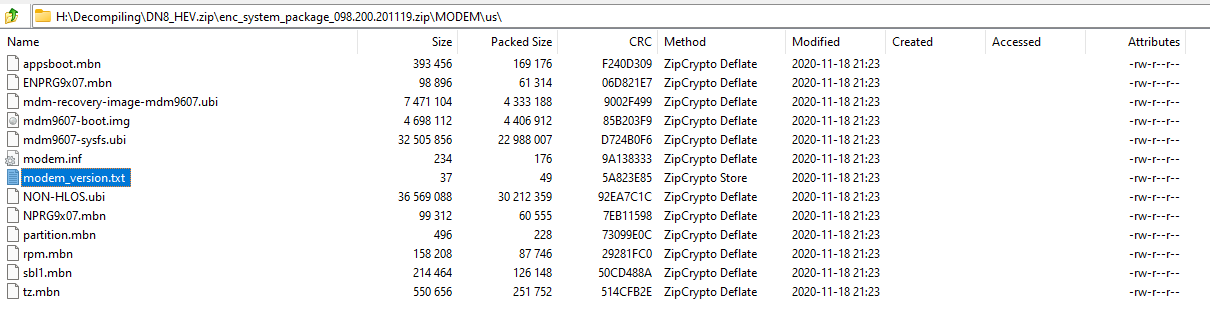
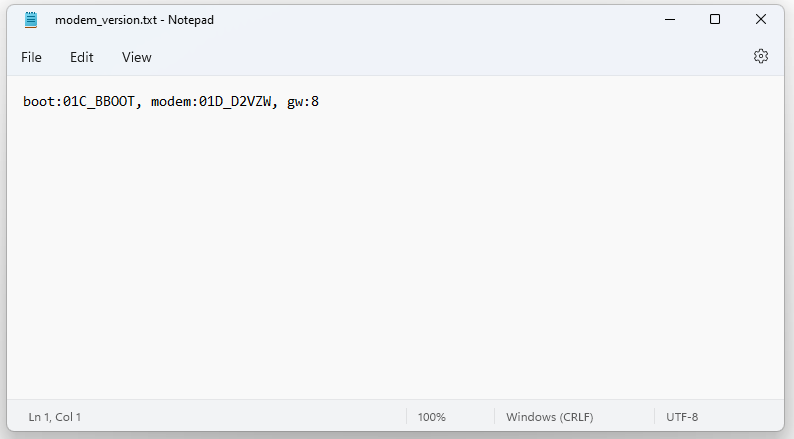
The hunt was one for a matching file. I looked through the encrypted zip’s file listing and saw a couple of good candidates for the attack. Inside the “MODEM\us” folder there was a modem_version.txt file that was 37 bytes long. Since it was a text file it was probably in a human readable format.
Initially I googled around for the file on the internet hoping I would find a match, but it mostly turned up dead FTP links, so I took another approach.
I hoped that Hyundai would reuse the modem modules in their IVIs and therefore the modem’s firmware files. If I could find an unencrypted modem update for another IVI, I could hopefully find a matching modem_version.txt file.
From Hyundai’s update site, I found out Hyundai has a special updater for their navigation IVIs.
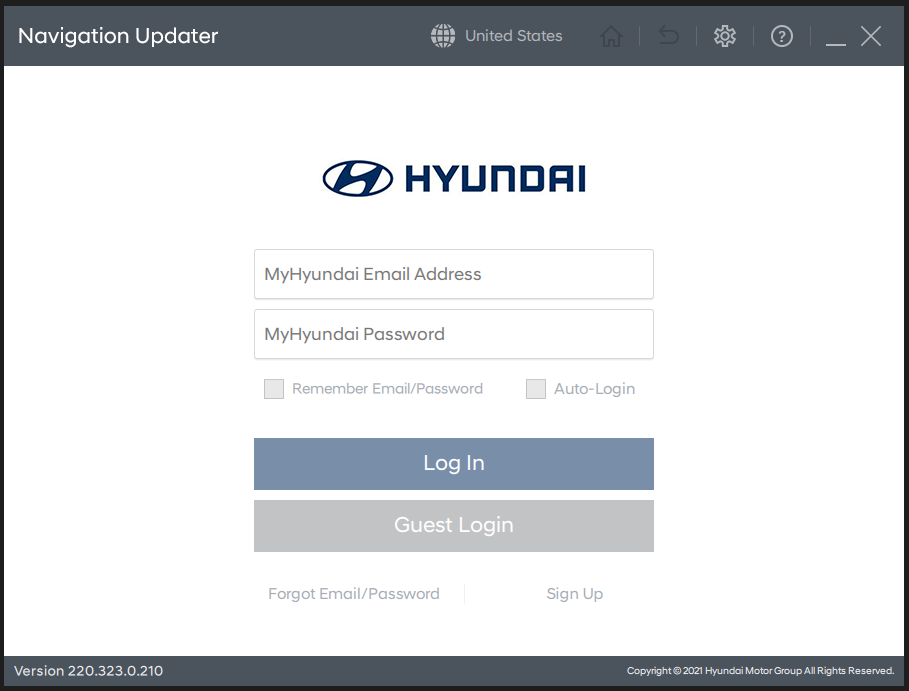
I installed the Navigation Updater software and downloaded the latest update for the 2020-2021 Hyundai Ioniq Navigation IVI.
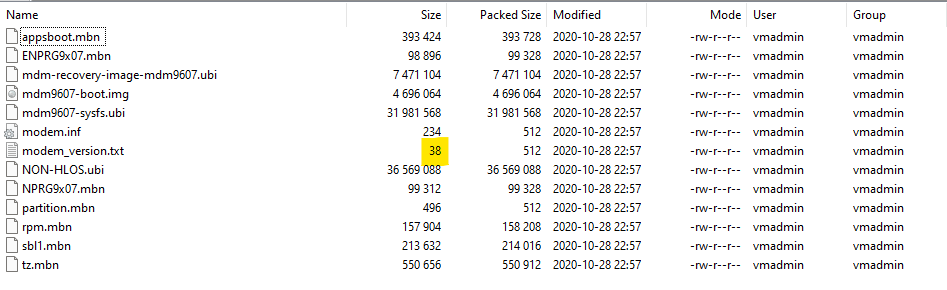
I went to where the updater downloaded the files and opened up the system_package tar file.

Inside there was a modem folder, and inside that was a very familar looking set of files! But the modem_version.txt file was the wrong size. :(
But, I knew that there were a ton of other files in there that could also be matches. But which ones were matches?
Comparing the two sets of files there were a few that were the same size, but there was no guarantee that the files has the same contents.
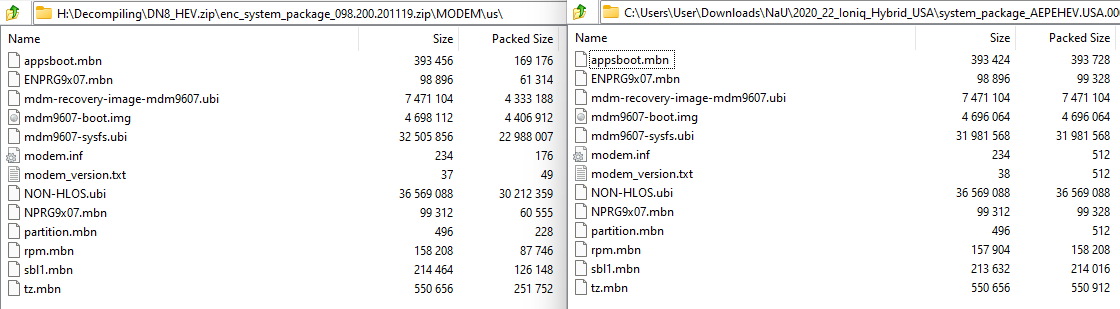
Luckily, zip came to my rescue. When a zip file is made, a CRC is calculated of each file within it. A CRC is a cyclic redundancy check which a zip extractor program uses to verify that the file was unencrypted/decompressed correctly. The same file should create the same CRC. Since the navigation’s update files were in a tar file and not a zip, I extracted them and then zipped them up.
 There was one pair of files that matched: “partition.mbn”. I found my plaintext.
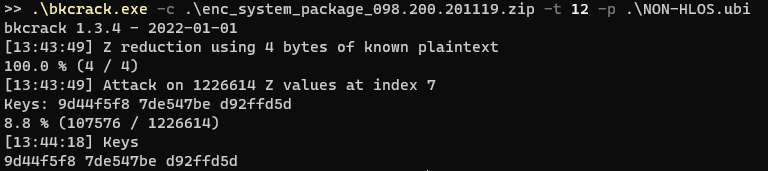
I loaded up bkcrack with my newly found plaintext and…
 It didn’t work? But why?
I ended up just throwing whatever I could at it to see if I could get some keys. As I found out, there are a lot of false positives especially if you limit bkcrack to the minimum 12 bytes of plaintext.
But trying to use these keys would simply result in an invalid zip file

I went back to the bkcrack Github issues page and read through all of the issues. It was there I found out that the “plaintext” needed was not the original file itself, but the correctly compressed version of the original file.
I needed to figure out the exact program and parameters that Hyundai Mobis used to compress the original zip.
I zipped up my partition.mbn file using the built in zip creator in Windows. That did not work. I then tried every single combination of parameters I could in 7Zip.
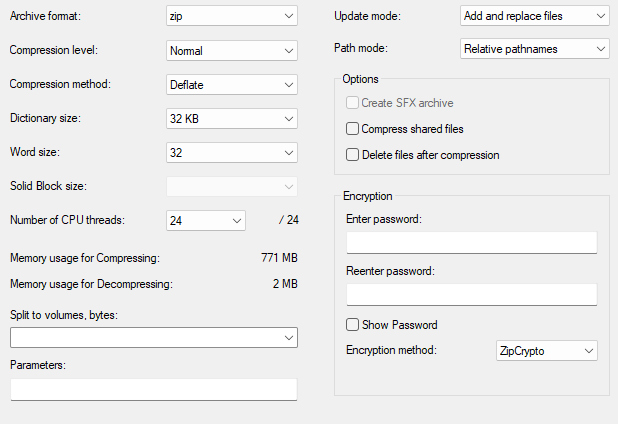
I even made a program in C# that used a compression library to create every combination it could. But nothing worked. I figured that it was unlikely Hyundai used an esoteric Windows zip program, so I moved to Linux.
I created a ton of zip files with various settings using the zip command line tool that came with my install of Kali.
I then went through each one by one, during which I also found out I was using the wrong parameters for bkcrack. I needed to specifiy the file entry inside the zip instead of the zip itself. After going through my list multiple times and trying multiple possible keys, bkcrack found it.

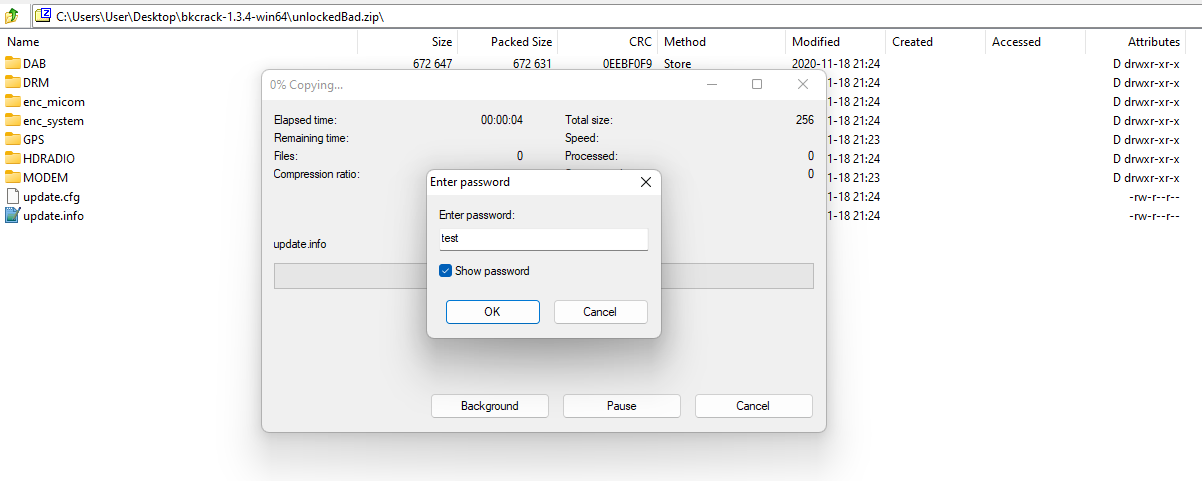
I used the “master keys” bkcrack found to make a zip and…

Finally?⌗
I was able to successfully extract every file from the encrypted zip!
bkcrack also allows you to recover the password of the zip from the master keys it finds, so I tried that, but it wasn’t able to find anything up to 16 characters long which was a long as I could reasonably crack on my PC.
But since everything was available to me now, I extracted the system.img file that was inside the enc_system folder. I learned many things from just the files available, like how Python and Perl was installed in the system. I thought that might come in handy for making a reverse shell in the future.
I eventually found where the apps were stored and started reverse engineering them. Luckily, since the apps had tons of debug info being printed out to the Logcat file, a lot of the important functions were trivial to label and reverse engineer.

Network Access⌗
I also found out that the driver for RTL8152/8153 USB ethernet adapters was installed.

I bought multiple RTL8153 based USB ethernet adapters in hope that there was some open ports. One of the adapters I bought had a built in USB hub that made it incompatible with the IVI, but the second one I bought was a direct ethernet adapter which allowed me to successfully hook up to the system. Unfortunately it only allowed me access to the CarPlay and Android Auto servers, there was no other ports available.
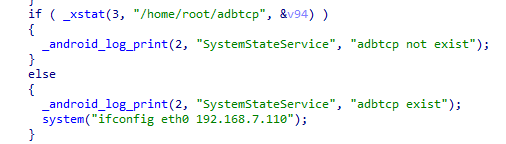
While reverse engineering the “automotivefw” binary I found out that the ADB TCP setting in the Engineering Mode set the IP address of eth0 to 192.168.7.110.
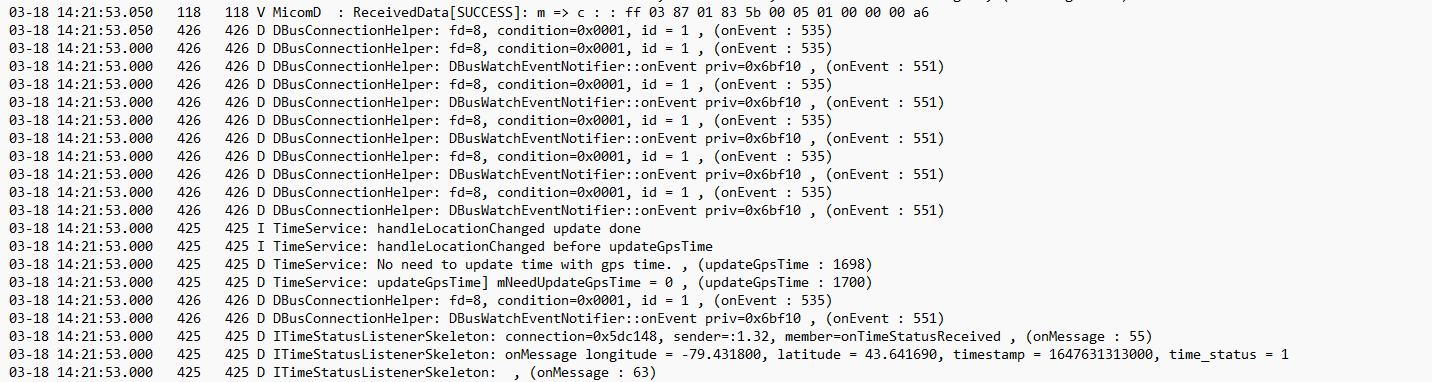
 Using the logs I found out that eth0 was supposed to have a MAC address of “F4:50:EB:2E:58:00”. I hoped that if I could change the MAC address of my RTL8153 adapter I could get access to this network which would hopefully have ADB access.
I passed my RTL dongle to my Kali VM and attempted to use ethtool to burn in a new MAC address to it. I quickly found out though that the RTL8153’s MAC address could not be edited using ethtool.
I searched online for any tool that could help me with this, but everything I read lead me to believe that the MAC address settings on these chips could not be edited. After hours of searching online I found images of Realtek’s RtPGtoolUI utility. Based on what I could find out about it, it looked like it was the utility used by the manufacturers to setup these USB ethernet adapters, including burning in their MAC addresses. Through all of the documentation I read I also found out many of these adapters used something called EFuses instead of traditional flash storage. If my adapter used EFuses there was a chance I could not update it even with the correct tool, but I held on to hope and kept searching.
I spent countless hours trying to find a download of the application. Eventually I found the right sketchy Chinese forum with a download.

With a little bit of fiddling I was able to successfuly flash a new MAC address to my adapter, even though it used EFuses.
Network Access?⌗
I plugged my newly flashed ethernet adapter into my car’s USB port, only to find nothing changed. I saw no different traffic through Wireshark. I could see the MAC address change was successful, but it did not give me additional access or even an IPv4 address.
I scanned the 192.168.7.110 address which did point to the IVI, but it only had the same CarPlay/Android Auto ports open.
After this I looked at the logs and realized that the eth0 device was some sort of built in ethernet adapter that was always offline. Whatever USB adapter I used would always appear as eth1. It was also at this point I realized that the Wi-Fi password was dumped into the logs when it was generated, meaning I could use the Wi-Fi connection instead. Connecting to the Wi-Fi yielded the same access as the ethernet adapter, except my laptop was finally given a proper IPv4 address.
Since the network access route was a bust and I was unable to find any backdoor or easy exploit through reverse engineering, I decided to try to take on the firmware update process.
Firmware Update⌗
If I could figure out all of the security measures of the firmware updates, I could modify an existing system image with my own backdoors, giving me full access to the IVI.
I could not find any binary within the system image that handled updating the firmware. The Engineering Mode app and the Setup app indicated once the Update button was pressed in the settings the IVI will boot into a recovery mode.
 Within the enc_system folder of the firmware update there was an enc_updateboot.img file. I guessed that this image contained the recovery system.
Unfortunately 7Zip was not able to extract the image like the system.img file, opening up the image in Notepad++ revealed why.
Within the enc_system folder of the firmware update there was an enc_updateboot.img file. I guessed that this image contained the recovery system.
Unfortunately 7Zip was not able to extract the image like the system.img file, opening up the image in Notepad++ revealed why.

There was no readable strings, the file was encrypted. I guess that is what the “enc_” prefix meant ¯\(ツ)/¯.
Looking at the other files in the update, all of them with the “enc_” prefix was encrypted.
I was stuck once again. Without the encryption key I wouldn’t be able to figure out any more of the system update process. I decided to continue searching through all of the information I already had. I continued reverse engineering all of the apps I could, I searched through the logs I extracted, and I looked through the open-source code from Mobis’s site I downloaded earlier.
Did I read that right?⌗
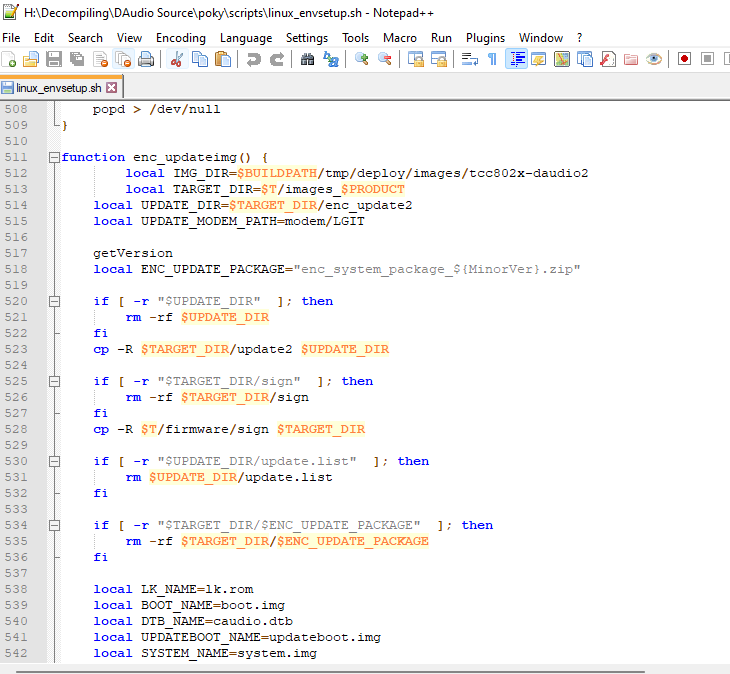
While looking through the source code avilable from Mobis’s site, I searched for all files that were shell scripts. In the results I found a shell script file called linux_envsetup.sh.
This file opened up everything.
Turns out this was the script that creates the system update zip file.
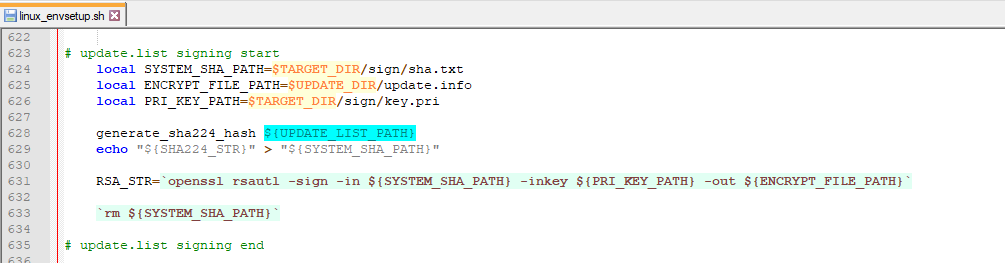
Turns out I had the zip password for the system update on my hard drive the entire time.

And helpfully the encryption method, key, and IV was also in the script.

The script also hinted at RSA signing being used, but unfortunately the key used for that was not in the source code.
But at least I had the encryption key. To verify that no one else had gotten this far I googled the encryption key.
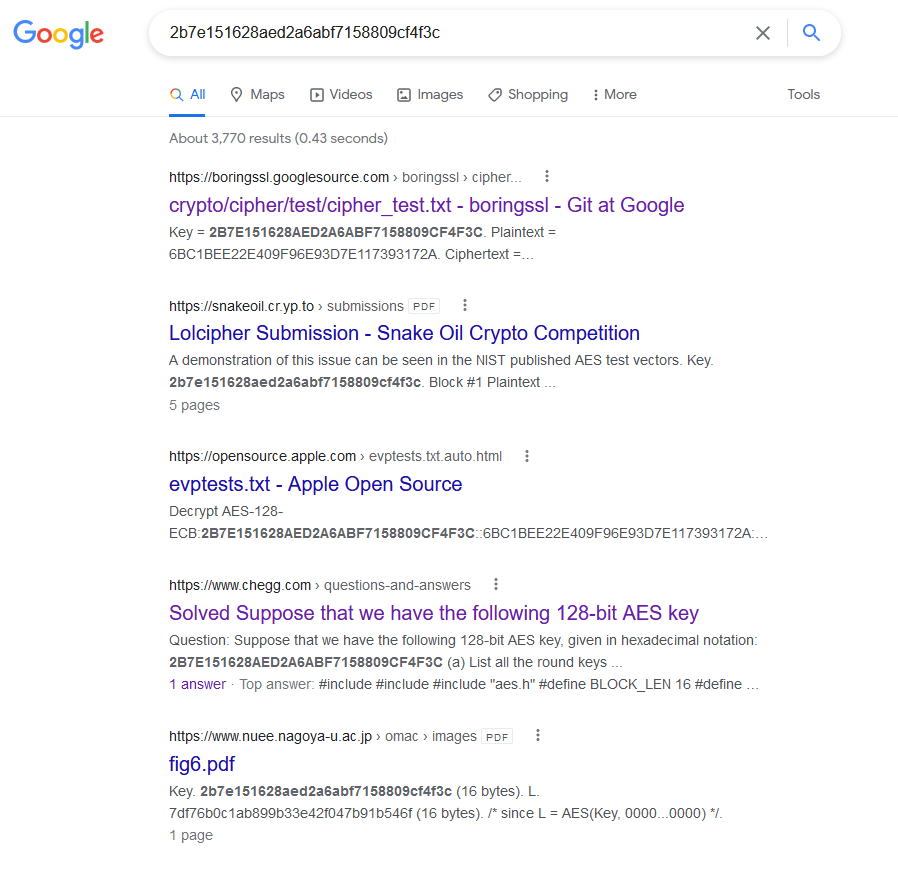
Google Git? Apple? Chegg????
Turns out the encryption key in that script is the first AES 128bit CBC example key listed in the NIST document SP800-38A.

Surely Hyundai Mobis didn’t use this key and this was only used for testing, right?
 No error? No, it can’t be…
I could open up the file in 7Zip, but it only had a single, corrupt entry.

But, running binwalk on the file revealed that the updateboot.img file was unencrypted successfully and had a ton in it.
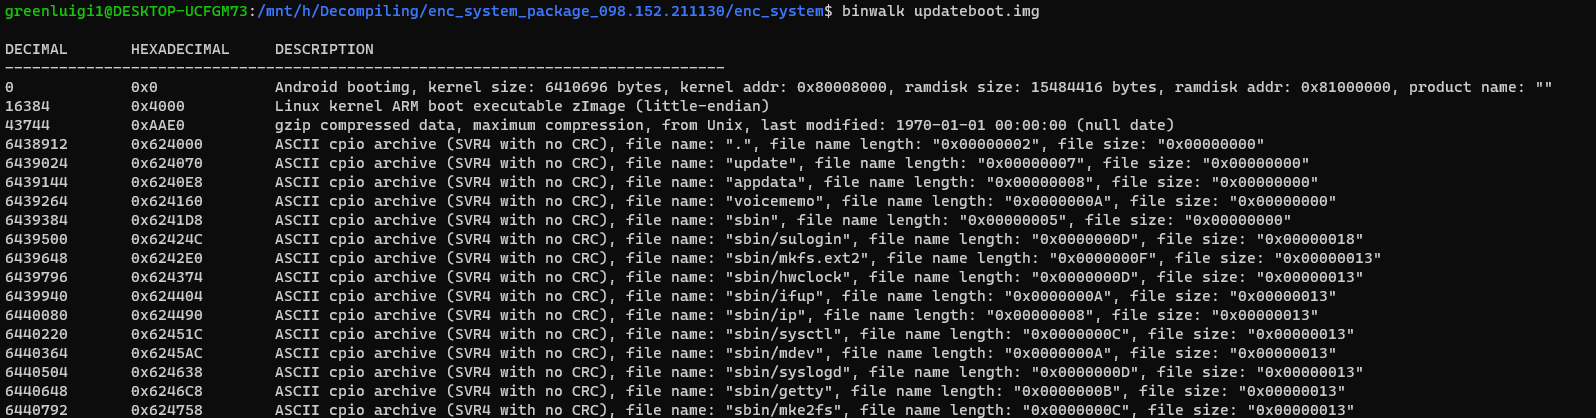
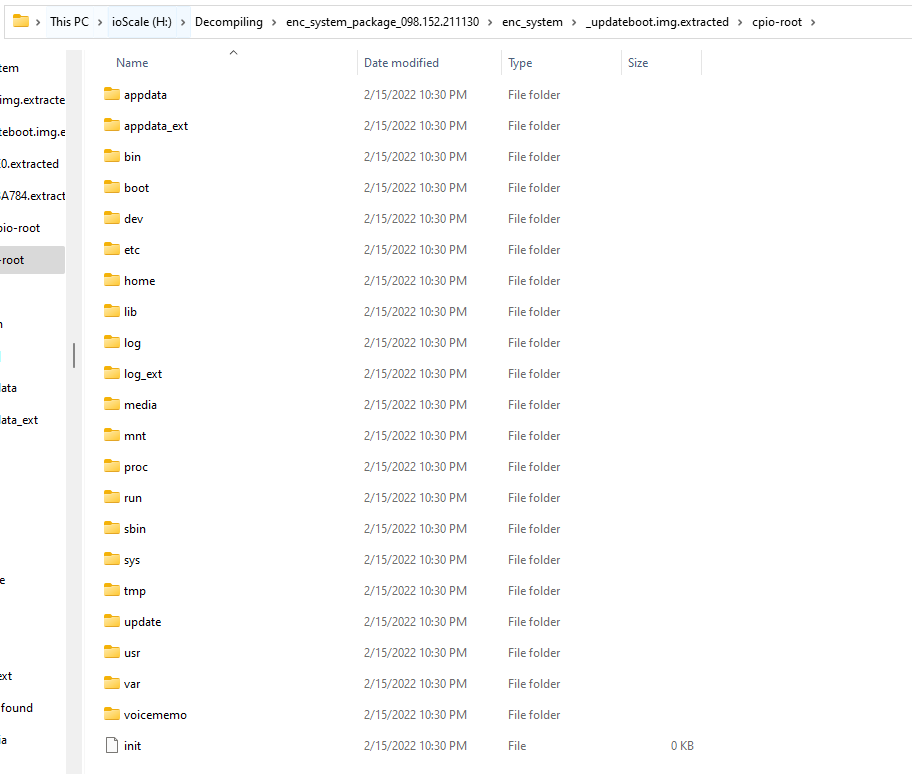
Using the -e (extract) argument with binwalk, I extracted the img file, revealing a barebones linux setup.
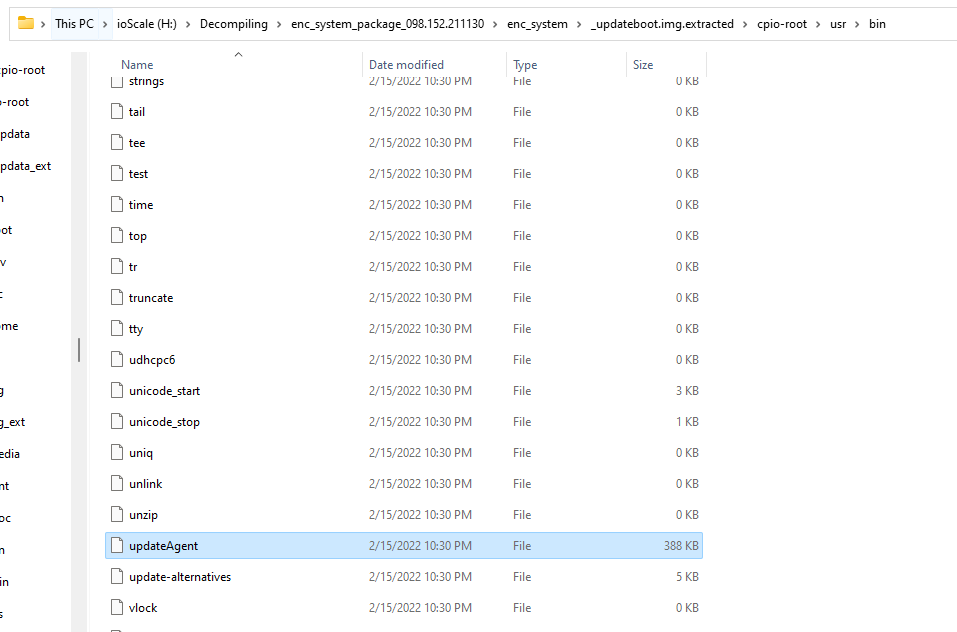
Inside the /usr/bin folder I found a binary called updateAgent which looked promising.
Since I already had the zip password and the encryption key, I decided to look for the signing key, with any luck they left not only the public key but the private key too.
After searching for some keywords like “RSA” I found the public key, but no private key.

I once again googled a part of the private key as a sanity check.
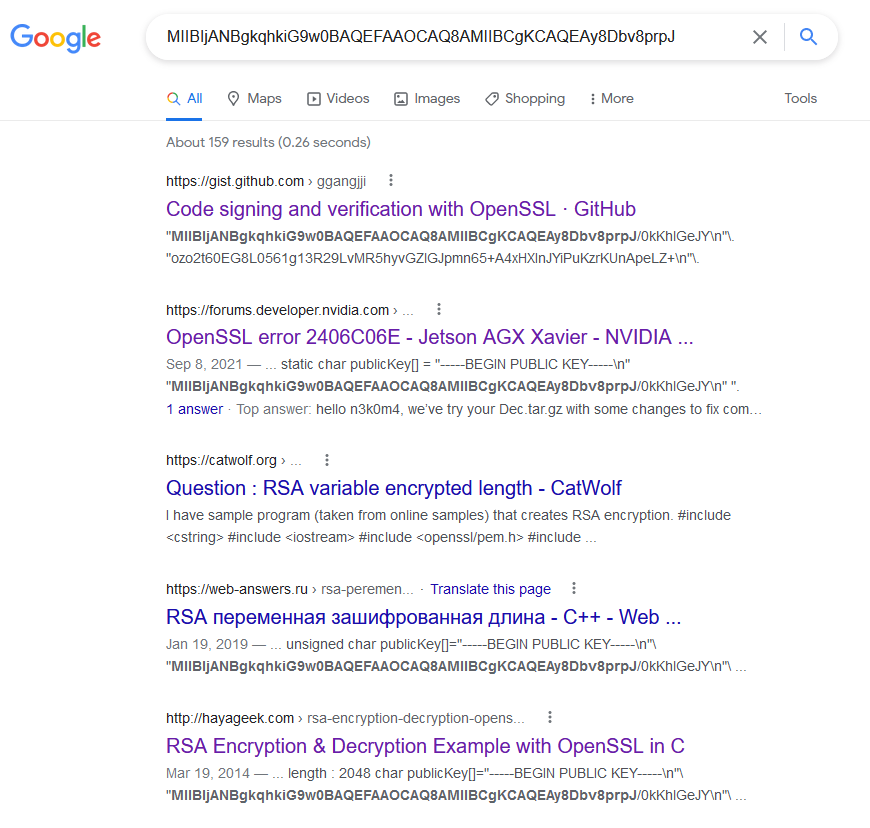
Oh, they used a very common key yet again. I have to wonder if they used that linked “RSA Encryption & Decryption Example with OpenSSL in C” tutorial…
The Waiting Game⌗
Now I had all the keys to the castle but there still wasn’t a firmware update available for my specific car. I did not want to take a chance and ruin my new car’s head unit. So I waited for an update to come.