How I Hacked my Car Guides: Creating Custom Firmware
Notice⌗
Note: As of 2022/10/25 the information in this series is slightly outdated. See Part 5 for more up to date information.
I take no responsibility for any damages due to the information or steps provided on this site. The content is for educational purposes only.
You modify your own car’s firmware at your own risk.
None of this process is approved by Hyundai, Kia, or Hyundai Mobis.
Background⌗
If you want to see how I got this far, check out the rest of my “How I Hacked my Car” series.
Creating Custom Firmware⌗
The non-navigation D-Audio 2V head units found in Hyundai and Kia vehicles run a fairly barebones version of Linux. Through my research and reverse engineering, I’ve been able to figure out the firmware update process down to a point where custom firmware can be developed for these systems.
In order for you to create your own firmware modifications, you need to verify a couple of things.
-
Your vehicle’s head unit is running D-Audio. Specifically Display Audio Gen2V. In order to verify that your head unit is running the correct version, compare the images on Hyundai’s Site.
-
A firmware update for your vehicle’s head unit should be available. The updates for Hyundai vehicles can be found here and the updates for Kia vehichle can be found here. Updates for D-Audio 2 system can be found under “Display Audio Software Update”.

-
Access to a Linux computer.
You then need to download the firmware update for your vehicle which can be found under the update sites above. The update file should be a zip file which contains another zip file which is named “enc_system_package_{version}.zip”. Extract this inner zip file onto a Linux computer.
I have created a set of scripts which help automate the extraction and modification of these updates.
Download these scripts and extract them into an empty folder and copy your firmware file into the same folder.
The folder should look like this:

Modifying Settings (Optional)⌗
Now the settings.sh file can be optionally edited if you want to change what folders the scripts use. The directories will be automatically created so there is no need to make them yourself.
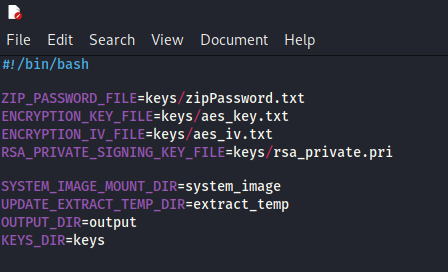 The available settings are as follows:
- ZIP_PASSWORD_FILE
- The location of the text file which contains the ZIP password for the firmware update.
- ENCRYPTION_KEY_FILE
- The location of the text file which contains the AES key which is used to unencrypt the encrypted files.
- ENCRYPTION_IV_FILE
- The location of the text file which contains the AES IV which is used to unencrypt the encrypted files.
- RSA_PRIVATE_SIGNING_KEY_FILE=keys/rsa_private.pri
- The location of the RSA private key used to sign the firmware update.
- SYSTEM_IMAGE_MOUNT_DIR
- The directory to mount the system image to.
- UPDATE_EXTRACT_TEMP_DIR
- The directory which holds the firmware files while they are being edited.
- KEYS_DIR
- The directory which contains the Zip Password and encryption/signing files.
All of the file locations in the settings file should be relative to the settings.sh file.
Setup the Environment⌗
Now run “./setupEnvironment.sh”, this will create the folders and file specified in the settings.sh file.
After this file is run your setup should look something like this:
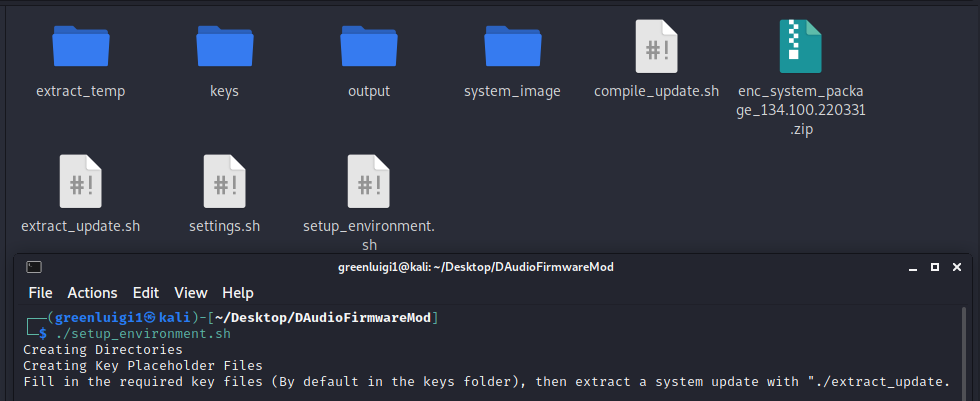
Now the keys in the KEY_DIR directory have to be filled. When entering these values make sure there is only one line in the file and that the file contains no extra spaces.
- zipPassword.txt should contain: “ahqltmTkrhk2018@@” (Without Quotes)
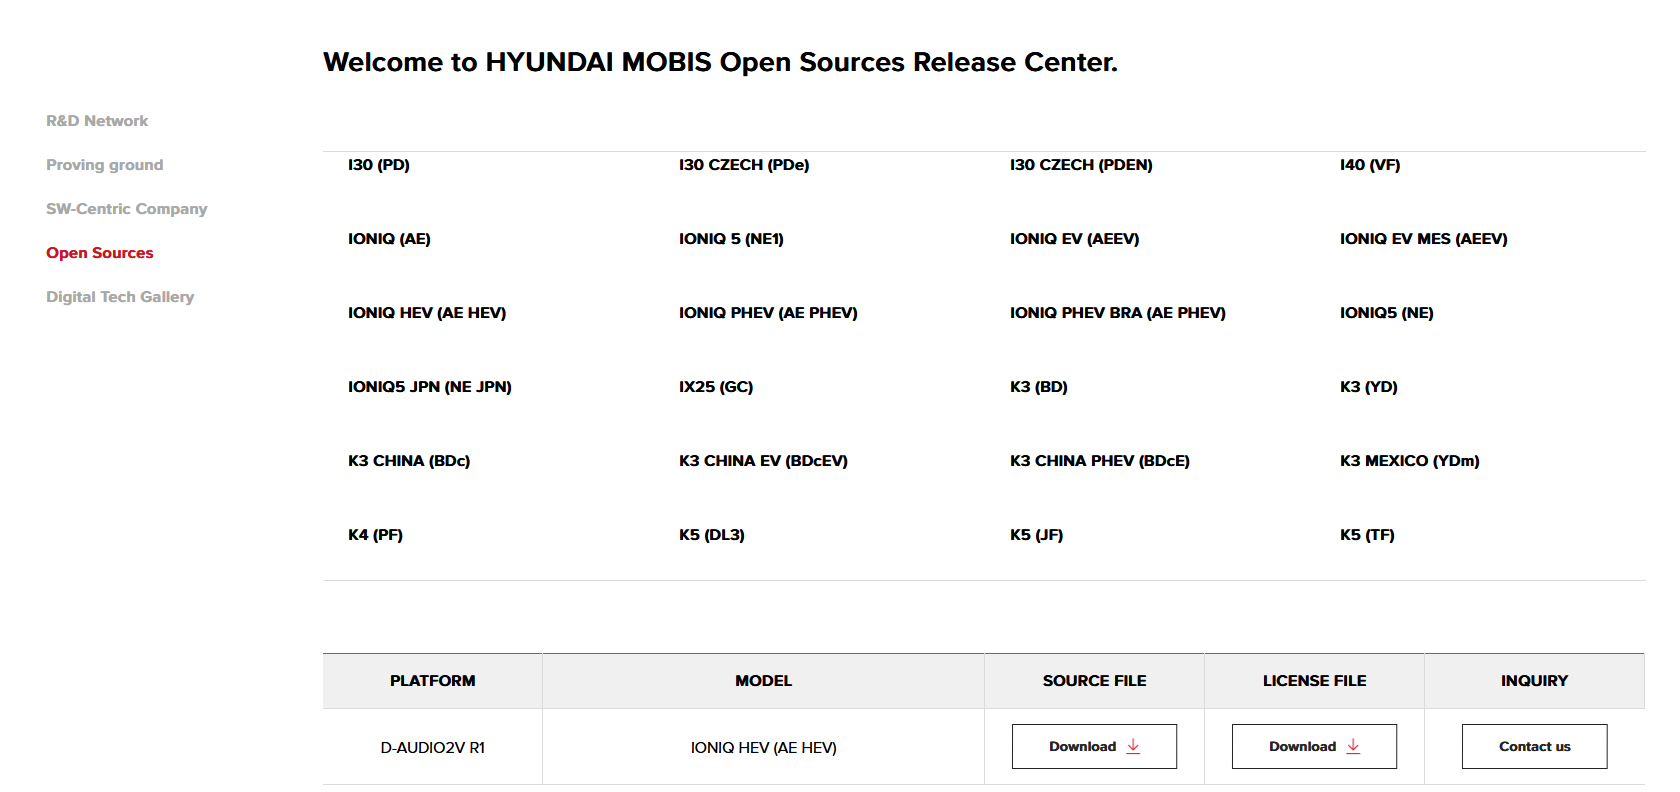
- This password was found by going to Hyundai Mobis’s Open Sources site, downloading the “D-Audio2V R1” file from any vehicle that has it
 Then extracting the “daudio_2.0value.yocto.poky.zip” zip and reading from the “scripts/linuxenvsetup.sh” file where the “zip” command is being used with the “-P” (password) argument
- This password was found by going to Hyundai Mobis’s Open Sources site, downloading the “D-Audio2V R1” file from any vehicle that has it
- aes_key.txt should contain: “2b7e151628aed2a6abf7158809cf4f3c”
- aes_iv.txt should contain: “000102030405060708090a0b0c0d0e0f”
- These values are from the same “linuxenvsetup.sh” file that the zip was from, they can be found in the generate_aes128_encryption function.
- These values are actually the first AES 128bit CBC example key/iv listed in the NIST document SP800-38A.

- rsa_private.pri can be downloaded here
Extracting the Update⌗
Once all of the keys and passwords are filled in the update file can be extracted by running ./extract_update.sh {Path to your update file}.
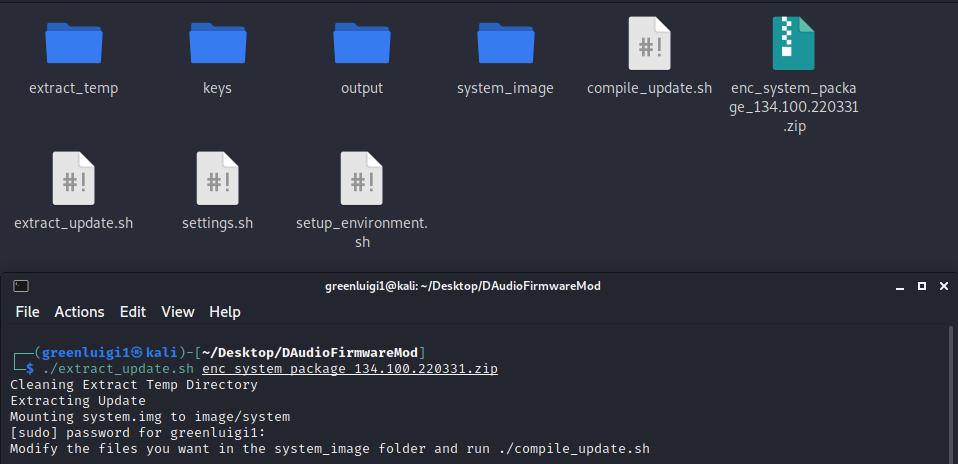
This script will:
- Clean up the UPDATE_EXTRACT_TEMP_DIR if it isn’t cleaned already.
- Extract the update file using the zip password file.
- Mount the system.img file to the SYSTEM_IMAGE_MOUNT_DIR (This requires sudo/Entering your password)
Modifying the Firmware⌗
Now the system image is mounted (By default to the system_image directory) and can be modified to your heart’s desire.
You can see the backdoors I added to my system in Part 2
ADB Backdoor⌗
Another easy backdoor that can be added is enabling the adbd (Android Debug Bridge Daemon) TCP server by adding it as a systemd service. The Android Debug Bridge is a common way to debug android devices and allows for pulling and pushing files to the device as well was launching interactive shells. A version of the Android Debug Bridge Daemon is located on these non-Android head units and was probably used for debugging during development.
To enable the Android Debug Bridge you can download this zip file and extract it to where your settings.sh file is located. Then you can simply run: “sudo ./createADBDBackdoor.sh”.
Note: The script requires sudo to access the systemd path inside the mounted system image. The added service will run the ADB server on port 5555 on the head unit on startup which can be connected to using Google’s adb command line utility while on the head unit’s network.

For information on how to use the ADB backdoor once it is installed check out the Additional Information about ADB section.
Compiling the Firmware⌗
Once you have modified your system image, you can compile it using the ./compile_update.sh script
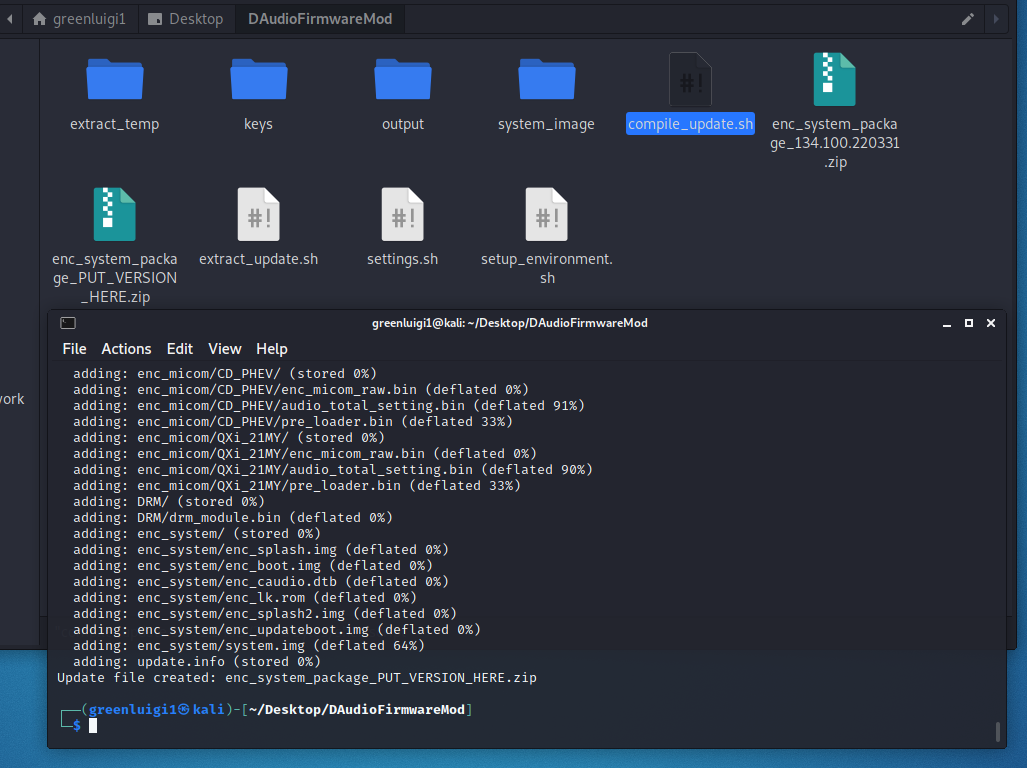
This script can take a little bit to run due to the hashing involved. The script goes through the following steps:
- Runs sync to verify changes are saved to the mounted system image.
- Unmounts the system image.
- Calculates the new update file list for the update and generates a new hash for the modified system.img file.
- Signs the update file list with the RSA private key.
- Generates the update zip file.
The file created will be named “enc_system_package_PUT_VERSION_HERE.zip” since I was too lazy to make it actually name correctly.
All you have to do is rename the created zip file to have the same name as the original firmware update zip and put it in the root of a FAT formatted flash drive.
Then the flash drive can be inserted into your car and the normal installation steps can be followed.
Note: The update process can take a while.
Then Bingo! Your modified firmware has been installed in your car.
Additional Information about ADB⌗
Once the ADBD TCP server service is running on your head unit you can connect to it.
In order to connect to it you must have a computer on your head unit’s network. There are a two ways to do this:
- If your head unit has a Wi-Fi hotspot, connect to the W-Fi
- If your head unit has wireless Android Auto/Apple CarPlay you can dump the Wi-Fi password by following these steps:
- Insert a flash drive into the head unit’s usb port.
- Go into the Setup screen on the head unit
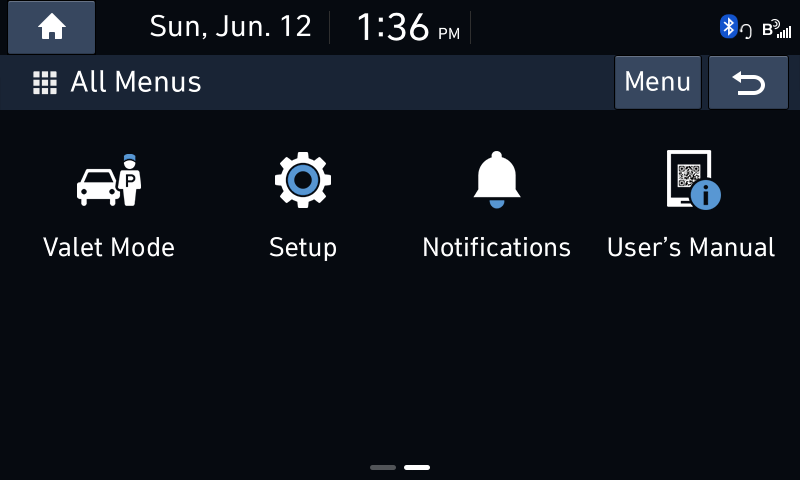
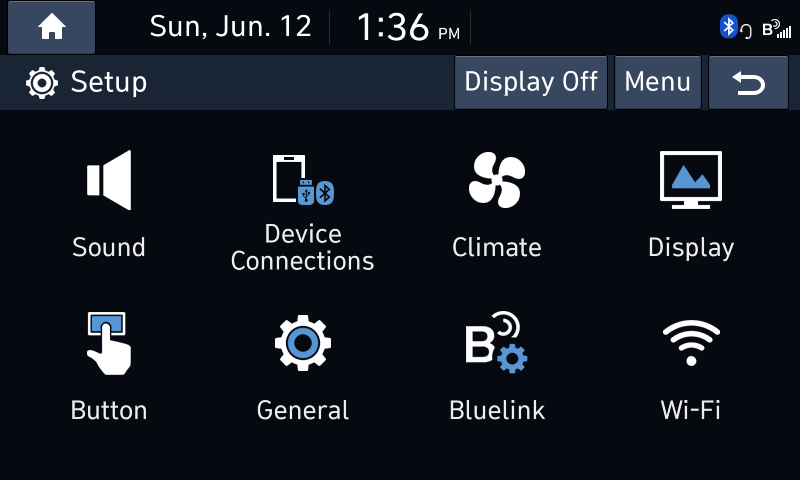
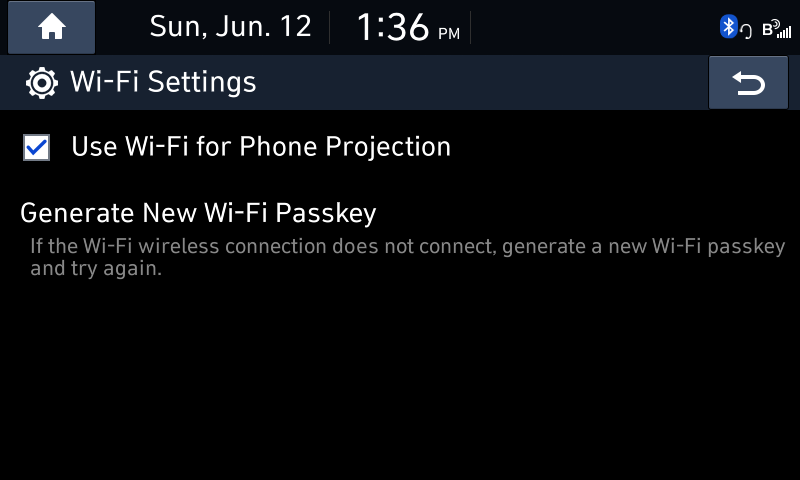
- Then Go into the Wi-Fi Settings and press the “Generate New Wi-Fi Passkey” button
- Dump the logs by either holding the physical “Radio” button down for 30 seconds or from the USB Settings in the Engineering Mode. In both cases a popup will appear which will allow you to copy the log to the USB drive.
- Extract the logs from the USB Drive and extract them.
- Open the Logcat file and search for the term “passphrase” the log entry will look like:

- Use the password to connect to the Wi-Fi
- Use an RTL8152/8153 usb to ethernet adapter to connect to the head unit
- The driver for RTL8152/8153 ethernet adapters is preinstalled. Adapters with USB hubs will not work. This adapter worked for me.
- Your computer will not be assigned an IPv4 address, so you will have to use a tool like Wireshark to find the head unit’s link-local IPv6 address.
Once you are connected: Download the adb command line tool and connect to the head unit by running this:
adb connect 192.168.0.1If you are using the ethernet adapter you have to replace the 192.168.0.1 with the head unit’s IPv6 address.
Then you can launch a shell by using the command:
adb shell /bin/bash